

Microsoft Outlook gives you the ability to create and manage contact details in a personal address book. Because Outlook encompasses email, contacts, scheduling and more, you can utilise these features across any task you are performing which is associated with one of your contacts.
In the past I have found users who manually enter email addresses when they send an email, rely on the AutoComplete List feature (where Outlook automatically suggests names when you start typing in the To, CC or BCC fields), however, this is time-consuming and not very practical in the broader scheme of things. If you don’t save them to your contacts, guess what happens when you get a new computer or new Office installation? They are gone!
It is a good idea to remember that once you take the time to set up your Contacts within Outlook, they are there forever, or until you decide to delete them. This will save you time and energy and reduce the need to go searching for a business card for that person you met last month so you can find their email address and send them a question.
Create a new contact
To create a new Contact, follow these steps:
- Open Microsoft Outlook
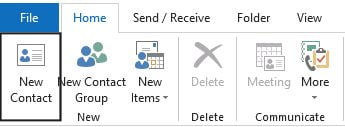
- From the bottom of the Folder Pane select the People icon

- From the Ribbon click the New Contact button or press Ctrl + N on the keyboard
- A new blank contact card will appear:
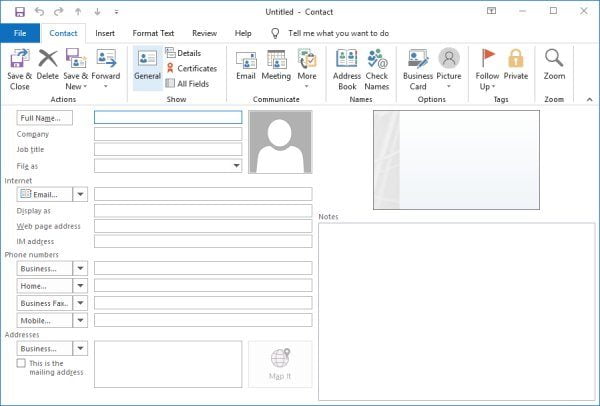
- The bare minimum fields you should complete are Full Name and E-mail
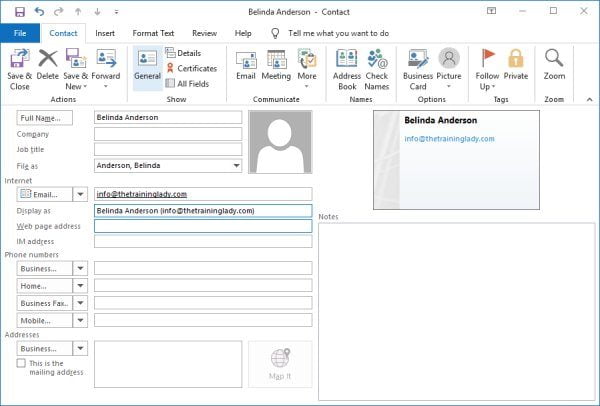
- Enter the person’s name
- Use the TAB key on the keyboard to move to the next field
- Move the cursor till it is in the E-mail field and type the person’s email address, remember to make sure you do not make any spelling mistakes
- Press TAB again and you will see Outlook will automatically fill in the Display as field (This is how the contact’s name will appear in an email message)
- I always use the Full Name (Email Address) format so that if a contact has multiple email addresses, I can easily identify that I’m sending to the correct one when I am drafting my email message
- If you wish to add more than 1 email address, use the drop-down arrow next to the E-mail button and select E-mail 2 and add a second address. You can add up to 3 email addresses per Contact
- Complete any remaining fields you wish to complete
- Now click Save & Close
- The new contact will be displayed in your Contacts list
- Return to your Inbox and open a new email message by pressing Ctrl + N
- Type the contacts name into the To field, if Outlook does not automatically locate the details, click the Check Names button from the Home Tab (should only need to do this once)
- Complete your email message as normal
You have now created a new contact using Microsoft Outlook. If you have any questions please comment below.


