

I use bullet and numbered lists a lot. They help me to summarise information and make my text stand out. I like to have my list items spaced apart a little, I don’t want them all squashed together. Let me show you how to change the spacing between items in a list.
Paragraph spacing is a great way to add a little more space between your paragraphs. I use this feature constantly so here comes the annoying part. When you apply paragraph spacing to a bullet or numbered list, sometimes the spacing is only applied above or below the entire list, not in between each item within the list.
Let me show you the little checkbox responsible for this annoyance and how you can fix it in a few seconds!
Add spacing between list items
- Open Microsoft Word.
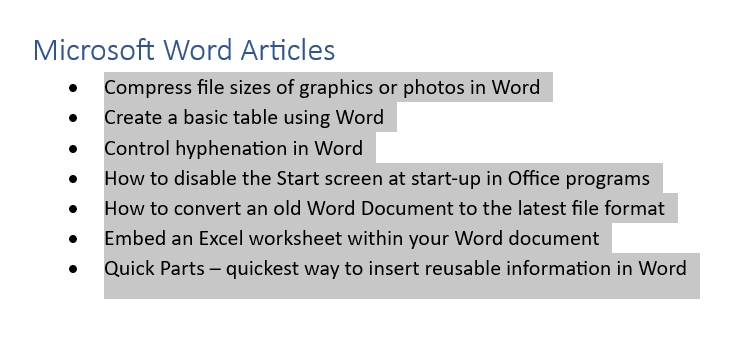
- You can now either create a very simple bullet list or open an existing document which already contains a list. Remember to use your shortcuts! Ctrl + O to go to the Open screen in backstage view or Ctrl + F12 to bypass backstage view and display the Open dialog box.
- Highlight all items within your list:
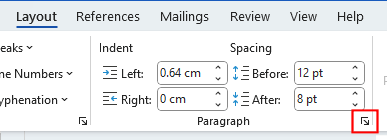
- Select the Layout tab from the Ribbon.
- From the Paragraph group, locate the Spacing section and use the up and down arrows to increase or decrease the Before and After spacing as needed. By default these increment by 6pt at a time. If you want to make it a different value, simply type in the spacing you’d like e.g. 8 and add the pt to the end for the measurement.
- You will see the spacing is only being applied above the list and/or below the list, not in between each item.
- To fix this, click the dialog box launcher to open the Paragraph Settings dialog:
- From the Paragraph dialog box, find the Spacing section towards the bottom and you should also then see a checkbox titled Don’t add space between paragraphs of the same style:
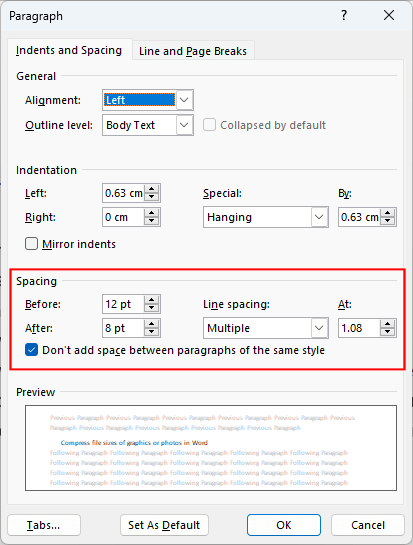
- Untick this checkbox.
- Click OK.
- We have now applied the Before and After spacing to every item within the list:
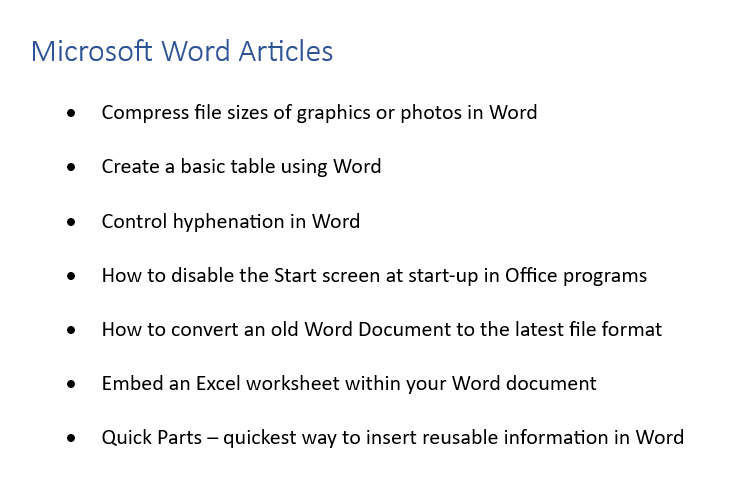
Problem solved! I hope this has helped to adjust your line spacing between bullet or numbered list items. Be sure to check out my other Microsoft Word articles.


7 Responses
Thanks so much for this @ The Training Lady!
The one thing I wanted to amend was not having the same amount of space between each line of text, but only space between each bullet point (i.e. single space between the lines of text for each bullet point, but then perhaps 6pt. between bullet points).
It was points 8 & 9 above: find ‘Don’t add space between paragraphs of the same style’ checkbox > Untick this checkbox
The one thing I hadn’t had the sense to do (obviously misreading the meaning of said checkbox – duhhh).
Thanks again!
Thank you so much!!
You’re welcome Marika.
That is great, but what if I have sentences that run more than one line. I do not want 1.5 between each line. I would like to have the sentence at single space and the between the numbers 1.5. Can you show me how to do that?
Hi Barbara,
It sounds as though you are using the Line spacing setting and choosing 1.5 lines. Instead try setting the Line spacing back to Single and then use the Before and After settings for Spacing which will only apply spacing above or below paragraphs (or sentences which run over more than 1 line). That should solve the problem.
This works well, but I have to do it every time for each bulleted list. I’d like all my bulleted lists to be 1.5 line spaced. Again I can do this with the Paragraph options but then all paragraphs are 1.5 spaced; not just the bullets. Any advice would be appreciated!
Hi Tim,
So glad to hear you have found the article useful. The best approach for this, so you don’t have to fix this every time you use a list, is to create a list Style. You can save these to the normal.dot template and therefore have it available in any document. You can then apply this setting within the Style. Here is a link to an article introducing you to Styles in MS Word.