

Inspired by my achievement this week where I reduced the number of emails in my inbox from over 1,000 down to 296, I thought it would be a great idea to touch on the processes of how to create folders in Outlook.
I asked the question online, “how many emails in your inbox?” and I received mixed responses. There was one clear winner with 91,097 unread emails in their iPhone inbox. WOW. Side note: Apple, take note and give us a “Delete All” option.
Email management on those very convenient, but sometimes life interrupting smartphones, is a whole different article. However, managing the hundreds, or thousands of emails you receive into your computer’s inbox is equally as important. A tidy inbox can ensure your day to day tasks are organised and easy to identify. (I need to take my own advice!)
So along those lines let’s now look at how you can create folders in Outlook (or any email client for that fact) and keep your inbox in tip-top shape.
Let’s create folders in Outlook
- Firstly open Microsoft Outlook and display your Inbox
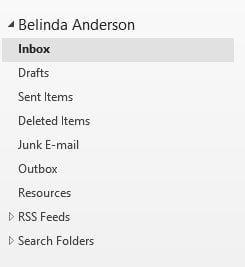
- On the left-hand side within the Folder Pane, you will see your email Mailbox containing folders such as the Inbox, Drafts, Sent Items, Outbox etc
- I have seen many people just start creating folders directly within the main mailbox directory. It ends up getting quite large and difficult to manage. Another option is to create a main folder which will then hold all the sub-folders you wish to store content in. Think of it as creating the filing cabinet first and then within that we create draws and folders.
- At the top of the mailbox you will see either your name or your email address:
- Select the Folder tab from the Ribbon and click the New Folder command
- The Create New Folder dialog box will appear:
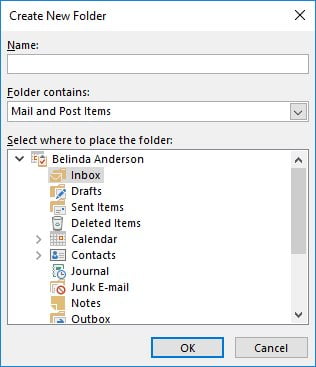
- In the Name field type the name of your main folder so you can easily locate it E.g. Files, Cabinet, Emails, essentially whatever you’d like to call your storage area
- Leave the Folder contains setting as Mail and Post Items
- From the Select where to place the folder section, select your name or email address which should be the first item in the list
- Click OK
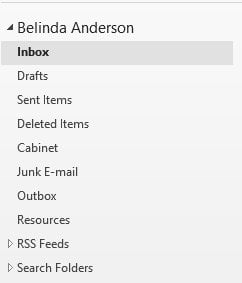
- You should now see the new folder within your mailbox items list (I named my folder Cabinet)
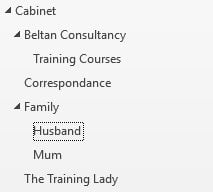
- Repeat the process to now create folders within your storage folder. I would create a folder for The Training Lady, Training Courses, Correspondance, To Do etc where I can sort and store emails in a relevant location should I need to look back on them in the future
- To move emails from your inbox simply drag and drop them into the folder you wish to store them in
Rename a folder
Now that you can see how easy it is to create folders in Outlook, what about when you need to rename a folder? That’s an easy one, follow these steps:
- Right mouse click on the folder you wish to rename
- Select Rename Folder from the shortcut menu
- Type the new name for the folder
- Press Enter to confirm the change
Move a folder
If you accidentally create a folder in the wrong place, you can move it using either of the following methods:
- Right mouse click on the folder you wish to move
- Select Move Folder from the shortcut menu
- The Move Folder dialog box will appear
- Select the new location for the folder
- Click OK to confirm the change
- The folder will now be moved to its new location
Alternatively, you can drag and drop the folder into the new location using the mouse.
Delete a folder
To delete a folder and move it to the Deleted Items area:
- Right mouse click on the folder you wish to delete
- Select Delete Folder from the shortcut menu
- You will now see a prompt asking you to confirm you wish to move the folder to your Deleted Items folder
- Click Yes to confirm or No to cancel
- If you chose Yes, the folder will now be within the Deleted Items folder allowing you to restore this in the future
I hope this has helped to improve the management of your emails and Inbox. Remember that your Inbox should not be a storage location – more so a place to hold any item which is pending action or your attention. Creating a logical folder structure to allow you to store emails in Outlook will streamline your work processes.
Another great way to keep that Inbox organised to the use of Rules. Check out how to create a rule to move email to a specified folder or create a rule to forward email to colleagues in Outlook. What technique helps keep your Inbox under control? Comment below.


2 Responses
Hi there from Australia,
Is there a way to highlight a folder name in color or a larger text so that folder really does stand out ?
As a builder, I have extensive trees of folders and subfolders …..
But each day I am constantly searching to the same places …..
maybe what I need is a short list of frequently used folders or favorites and group them together?
Any thoughts would be appreciated
Hi Albert,
I am located in Australia also so welcome. 🙂
Unfortunately, there is no way to colour or make the name of a folder larger so it stands out. You could, however, use the Favorites list in Outlook to put your most frequently accessing folders into so you have direct access. I use this feature myself. Locate a folder you want to “favourite”, and right mouse click it and select “Add to Favorites”. It will be displayed above your full mailbox folder list.
Hope this helps.
Regards, Belinda