

Recently I saw a question asking how to create a “memory game”, or a game of concentration using Microsoft 365. While there are third-party programs that can do this, I assumed that there would be a way to create this using PowerPoint. I’ve created lots of fun games using Microsoft PowerPoint in the past. The idea of creating a game of concentration was going to take some deep thinking. This is the stuff that keeps me up at night.
Microsoft PowerPoint has great animation options which provide the effect of “flipping” a card over. That part was easy. The tricky part was wanting to be able to click and “flip” a card over and then if the match isn’t correct, we need to flip them back over ready for the next persons turn. This is where Triggers come into play.
Warning: This is a pre-warning – this is a little fiddly and repetitive. I have tried a few ways of creating this game and found this to be the easiest so far. I do not recommend trying this at 10pm like I did. If you persevere, you will end up with an amazing interactive game of concentration that your students will love. Once the animations and triggers are set up and working, you can use the file as your “template” and create additional games of concentration using whatever topic you want with some minor adjustments.
Create the cards
Firstly we are going to use the Shapes feature in Microsoft PowerPoint to create our “cards”. In this example, I’m going to create 12 sets of cards, however you can create as many or as few as you want for your game.
- Open Microsoft PowerPoint.
- Create a new blank presentation:
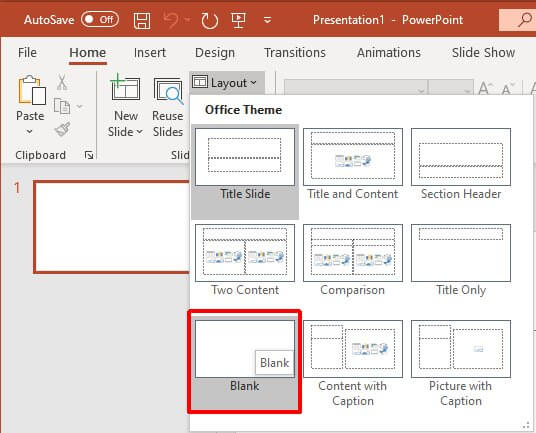
- We need to change the slide layout so that we have a blank canvas to work with.
- From the Home tab, click the Layout button and choose Blank:
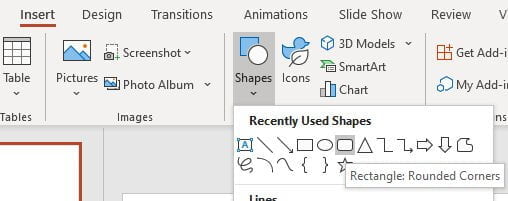
- Now we will add our first shape, click the Insert tab and choose Shapes.
- From the shape options choose a rectangle with rounded corners or the shape of your choice:
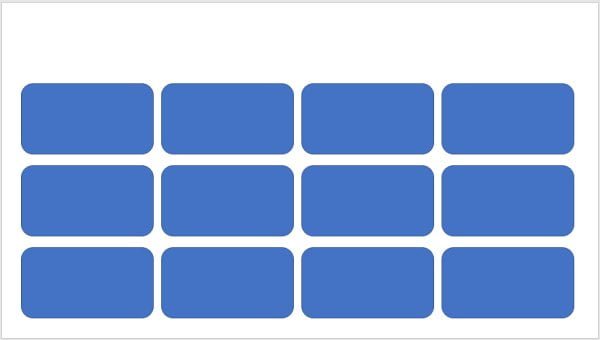
- Click and draw the shape on the slide at about the size you think you’ll want it (Mine are 7.5cm wide and 4cm in height), you can change the shape sizes later if needed.
- Click on the shape you just created and press Ctrl + D to duplicate the shape, repeat this so you have 4 in total for the first row.
- Move the shapes so they are sitting beside each other across the first row.
- Select all four shapes (hold down the Ctrl key and click with the mouse) and now press Ctrl + D to create a full second row and once more to create a 3rd row with a total of 12 cards.
- Move the cards into place on the slide:
- Now we need to create the bottom cards.
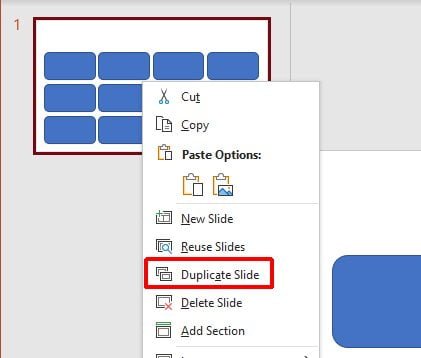
- Right mouse click the slide within the navigation pane and choose Duplicate Slide:
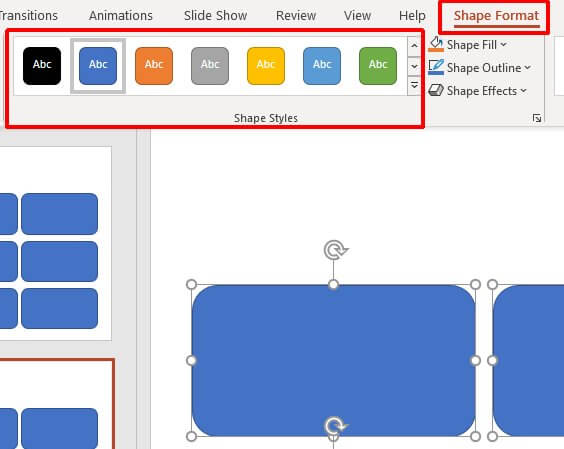
- Select slide 2 and we will now change the colour of the second set of cards.
- Select one of the shapes on slide 2 and press Ctrl + A to select all
- Click the Shape Format tab and choose a different colour from the Shape Styles gallery:
- So you now have one set of shapes for the top side of the cards on Slide 1 and another set for the bottom side on Slide 2.
Add pictures to the bottom cards
If you want to have pictures displayed on the bottom cards, you will need to insert the pictures now. Once the picture has been inserted into the slide, you will need to group the picture and the back card together. This makes them into one object so that when you apply an animation effect, the effect will be applied to the picture also. This is great for younger grades where you want them to match based on pictures.
Tip: Do not leave this till the end of this exercise or the names of your shapes and your triggers will all be messed up. Add pictures BEFORE you name the shapes.
- Make sure you are on Slide 2.
- From the Insert tab select Pictures > This Device.
- Locate the picture you wish to insert and click OK.
- Resize the picture so that it will fit within the card shape.
- Select the picture then hold down Ctrl and select the bottom card.
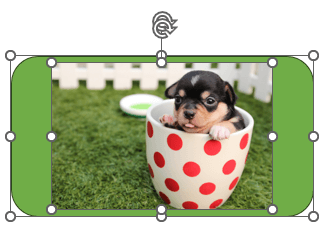
- Right mouse click on them and choose Group > Group from the menu.
- The picture and bottom card will now be grouped as one object.
- Repeat this to add pictures to the remaining card shapes.
Edit the name of each shape
Later when we begin adding triggers to each shape, it will start getting very confusing about which one to select. PowerPoint gives each shape a name based on the shape type and then adds a number to the end. We can go in and name the shapes ourselves so that later when we add triggers, it will be much easier for us to identify which shape we need to trigger.
- Select slide 1 and then select one of the shapes.
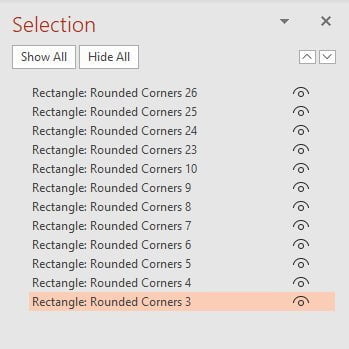
- Click the Shape Format tab and click the Selection Pane button:

- All shapes will be displayed in the list along with the name they have been given.
- My shapes are named Rectangle: Rounded Corner 3, Rectangle: Rounded Corner 4 etc
- Select the first shape you created, which will then highlight its name in the list, most likely the smaller numbered shape.
- Double click the name and edit it to be something short and sweet but easy to identify E.g. Top1 then press Enter.
- Repeat the process for all shapes.
Tip: If the shapes are not in the correct order, drag and drop them into an order which makes sense. It makes it easier to work with later.
- Repeat the above process and rename the shapes in slide 2 for the bottom cards but this time name them so that you can tell they are the bottom cards. E.g. Bottom1
Apply the Shape Animations
Next, we want to apply the animation effects that will make our cards appear to “flip”. We will need to apply an effect to the top card to make it disappear, and then we will apply an effect to the bottom card for it to appear. I am using the blue card as my top card, and the green card as my bottom card.
Hide the Top Card
- Select slide 1 which has all our top cards.
- Select any shape and press Ctrl + A to select all. We want to apply the first animation to ALL shapes so that we only need to do this step once.
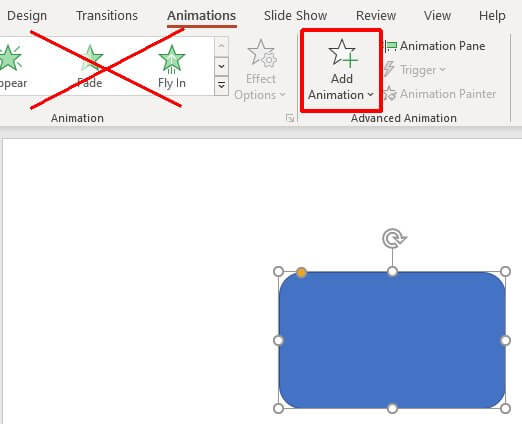
- Select the Animations tab from the Ribbon.
- Because we will be applying multiple animations to each shape, you need to ensure you use the Add Animation button rather than just selecting an animation from the gallery.
- Click the Add Animation button and select More Exit Effects as we want to make the card disappear:
- The Add Exit Effect dialog will appear:
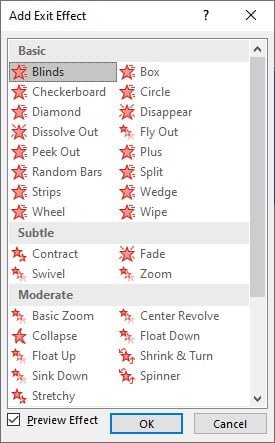
- You can experiment with the different animation options here, however, I am going to use a simple Collapse effect.
- Select the animation effect and click OK.
- All the animations are defaulting to Start: On Click so that will mean that when we click a shape, it will cause the animation to happen.
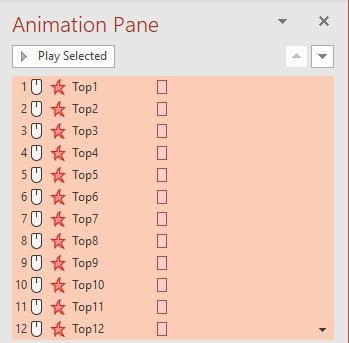
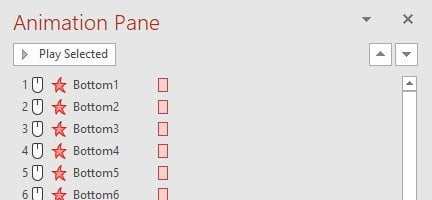
- From the Animations tab select the Animation Pane button.
- This will give a great overview of all animations on the slide:

Make the Answer Card appear with an Effect
Once the top card disappears with the above effect, we want another effect to display the answer card underneath.
- Select slide 2.
- Highlight all shapes again and click the Add Animation button.
- Choose More Entrance Effects.
- The Add Entrance Effect dialog will appear:
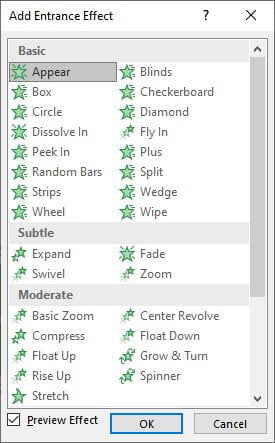
- Again you can experiment with the different options here, I am going to use the Stretch effect.
- Click OK.
- The Animation Pane will show the animations again.
- Now we need to combine the cards into one slide.
- Ensure all shapes on slide 2 are highlighted.
- Press Ctrl + C on the keyboard to copy them.
- Select Slide 1.
- Press Ctrl + V to paste.
- You will now see both the top and bottom cards on the same slide along with all the animation effects you have applied so far:
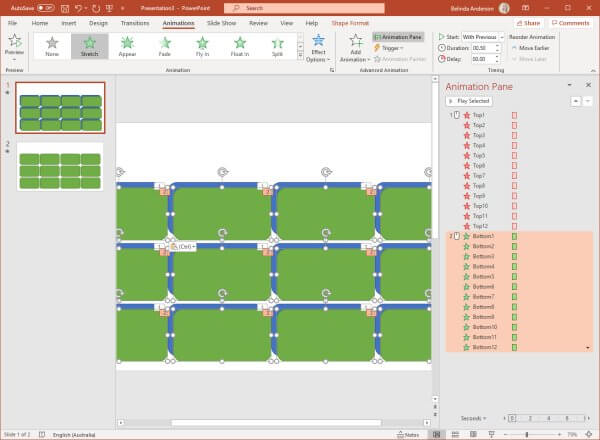
- The top card exit animations should be first in the list, then followed by the bottom card entrance animations.
Edit when the animation will start
At the moment the animation effects are set to either start On Click or With Previous. This means we would need to click on the screen to have these effects show. This is fine for the first effect because we want students to have to click the card and then from there we want the top card to disappear, AND the bottom card to appear. But we need all the exit effects to be set to On Click and all the Entrance effects to be set to After Previous.
- In the Animation Pane, select the first Exit effect for card 1 which should have the red icon next to it, I named mine Top1.
- Hold down the Shift key and click the last Exit effect for card 12 which again will have the red icon.
- From the Animations tab change the Start option to On Click:
- Now select all the Entrance effects and change the Start option to After Previous.
- You can also change the Duration setting to speed up or slow down the animation effect if you like.
Create the Trigger event
Now it’s time to set up our triggers. Triggers are great when working with multiple animations on one slide. It means we can identify what our trigger is to begin an animation sequence. In our case we want to create a trigger so that when a specific card is clicked, the animation sequence for that card and the one underneath begin. If we just created the animations and didn’t use triggers, we would end up with animations which have a specific sequence and would not allow students to randomly pick which animation to run.
- Select the first shape which should be your top card from the Animation Pane.
- Right mouse click and select Timing from the menu:
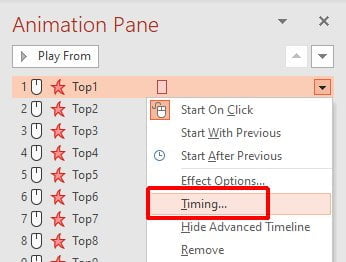
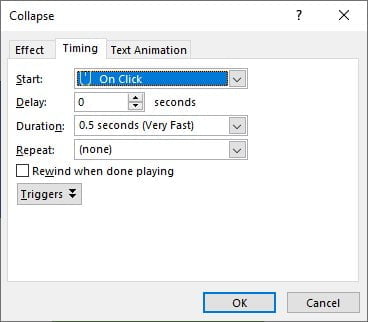
- The Collapse dialog box will appear with the Timing tab selected:
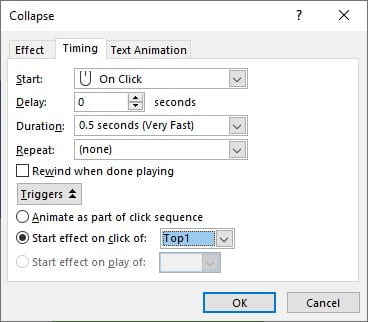
- Click the Triggers button.
- Choose the Start effect on click of option.
- From the drop-down make sure the top card is selected (see how much easier it is when you see easy names). E.g. The first top card has the trigger of itself, the second top card has a trigger of itself etc.
- This means that clicking on the first shape will trigger the next event to happen. We are saying that the trigger for this shape is itself:
- Click OK.
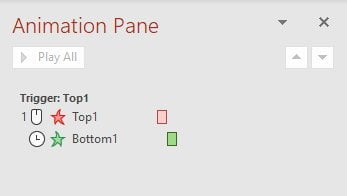
- The Animation Pane will now show the trigger you have set up with the top card listed within the trigger:

- Because we still want the bottom card to appear after the top card disappears, we need to move the bottom card effect inside the trigger group.
- Locate the first bottom card effect then drag and drop it underneath the top card trigger:
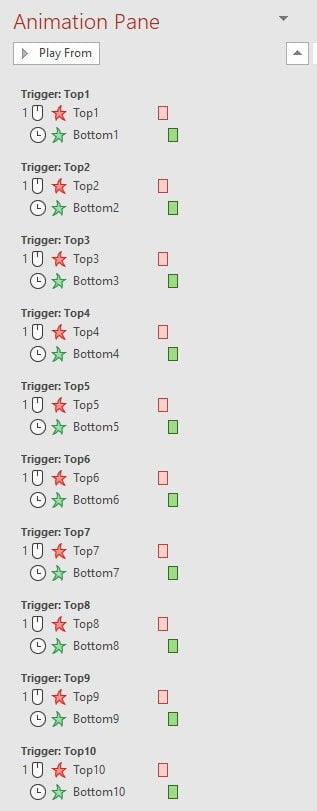
- Here some the repetitious part of the exercise. You will need to repeat this trigger for each of the cards. Set each so that the trigger is itself. Then move the corresponding animation for the bottom card into each trigger group. Your animation pane should end up with a trigger group for each set of cards, as shown below:
Test out the Trigger
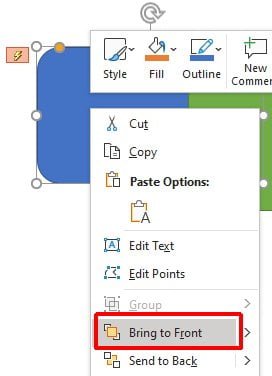
- Use your mouse and position the top shape over the bottom shape.
- You will see that the top shape will be positioned behind the bottom shape, this is due to the layering of shapes in the order we created them.
- Right mouse click the top shape and choose to Bring to Front:
- Now move the shape directly over the top of the bottom shape so that the bottom shape is not visible.
- Press F5 on the keyboard to run the presentation in slide show mode.
- You should be able to place your mouse over the card and see the hyperlink cursor appear.
- Click once and the top card should disappear, and the bottom card appears:
Create Animations to return the cards back to normal
We’ve created the first animations which are great. Our top card disappears and our bottom card animates to display itself. When students choose two different cards they will be able to see the bottom card for both. If those bottom cards are not a match, then we need them to be able to flip them back over again so the next student can have a turn. So we need to repeat what we just did but in reverse.
- For this part I find it easier to move the shapes off of each other so they can be easily seen, we can layer them back over each other again at the end.
- Select the top cards by holding down the Ctrl key and clicking each one with the mouse.
- We want to add the next animation to our bottom cards first so their animation will be first in the sequence.
- Previously we added an Entrance Effect to the bottom cards to make them appear, now we want to apply an Exit Effect to make them disappear. You must create this second set of animations in reverse order. Apply the animation to the bottom card first, then we will apply to the top card.
- Select all the bottom card shapes.
- Click the Animations tab and then click the Add Animation button and choose More Exit Effects.
- The Add Exit Effect dialog will appear:
- Again you can experiment with the different options here, I am going to stick with the Collapse effect.
- Click OK.
- The Animation Pane will now show an exit effect for the bottom cards.
- Now select the top card shapes.
- Previously we added an Exit Effect to make the top card disappear, now we want to apply an Entrance Effect to make it appear again.
- Click the Add Animation button and choose More Entrance Effects.
- The Add Entrance Effect dialog will appear:
- I am going to stick with the Stretch effect and click OK.
- Again you have another animation for the top shape and the new animations are not part of a trigger:
Edit when the animation will start
Just like previously, we need to set the first animations to start On Click and the second animations to start After Previous.
- Select the set of exit animation for the bottom shape.
- Change the Start option to On Click.
- Select the set of entrance animation for the top shape.
- Change the Start option to After Previous.
Create the next set of Triggers
Let’s create the final set of triggers so that students will be able to reset the cards if their cards do not match.
- Select the exit animation for the first bottom card from the Animation Pane:
- Right mouse click and select Timing from the menu.
- Click the Triggers button.
- Choose the Start effect on click of option.
- From the drop-down chose the same shape from the list. We have highlighted the bottom shape so make sure you choose the bottom shape from the list.
- This means that clicking on the bottom shape, will trigger the next event to happen.
- Click OK.
- You should have a new trigger set displayed.
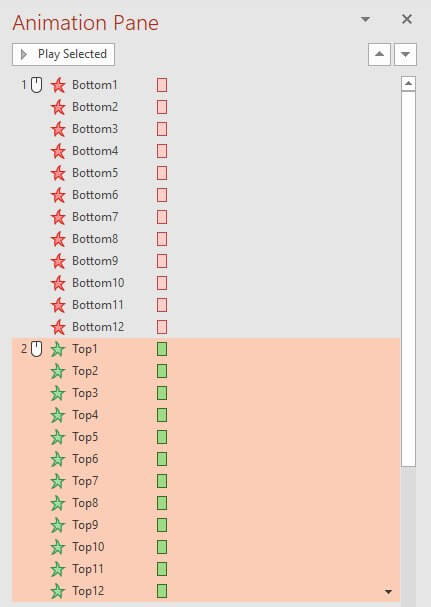
- Drag and drop the leftover animation for the top card down into the trigger group.
- You should have two separate sets of Trigger items for each card. One set has the top card animation first then the bottom card. The other set will have the bottom card first then the top card.
- Drag and drop the top card back over onto the bottom card so the bottom card is hidden.
- Let’s test out the triggers all work. We want to be able to click and display the bottom card, then another click on the bottom card should bring the top card back.
- Press F5 on the keyboard to launch the slide show.
- Voila, you should have one perfectly working set of cards.
Final touches
At the moment, if students accidentally click on the slide background area, it will end the slide show presentation and stop the game. To avoid this happening you can turn off the option that allows you to advance the slides within the presentation using the click command.
- Select the Transitions tab.
- From the Advance Slide section remove the tick from the option to use On Mouse Click.
- Press F5 to test the game again.
Check out the picture demo
I’ve created a quick video demonstration showing the end result of what your game of concentration could look like in PowerPoint. My example here is using pictures on the bottom cards.
I hope this has helped you to create an interactive game of concentration using Microsoft PowerPoint. Comment below with any questions.


6 Responses
Thanks for this, but before I start, I’m guessing its the same game every time and does not randomize¿
That is correct.
I loved your tutorial. I was able to make a game. One shortcut I found is that you can select multiple objects in the animation selection pane. So if you select both the top1 and bottom1 objects, then right click to select timing, you can apply the trigger to both objects at once. Saves a lot of steps.
Thanks, thats really good explanation and appreciate it.
Is it possible to turn the card over automatically, if its not a match. If its a match, then the cards can remain showing the matching pictures. Any idea?
Thanks
First of all: thanks for the really helpfull description!
I could make a template but now I wan’t to change my bottom cards with new words and pictures and the whole animation pane looks different.
Any idea what I did wrong?
Hi Barbara,
Congratulations on setting up the template. If you highlight all the top cards, you should be able to move them to the side a little giving you enough space to edit the content on the bottom cards. Then move them back once you are done. This “shouldn’t” mess up the animation sequences. Always keep an original copy of your template so that if something does happen you always have that original to go back to with all the sequences in the correct order.
I found I had to go back and resort my animation triggers at one stage also.
Regards, Belinda