
When working with long documents in Word, you may find yourself searching for an easy way to link content between different pages. I’ve seen many imaginative ways of performing this function using Microsoft Word but today I want to show you the easiest way.
Let me introduce you to a cross-reference. What is a cross-reference you may ask? Put simply, it is a method used to refer to another topic within your document and have Word link to it. Let’s have a look at an example of a cross-reference below:

You can see at the end of the paragraph the text (See File Formats on Page 15). The text “File Formats” and the page number are both links which when clicked will move you to either the particular heading or page number within the document. A cross-reference is essentially an internal hyperlink within a Word document which places text within a paragraph and links to content in another paragraph or page.
I have seen many people manually create a cross-reference however using the built-in function provides you with several advantages:
- The reader will be able to click the cross-reference link and Word will automatically move to the heading or page referenced. The reader will not need to scroll to locate the content;
- As the document is updated and headings or content potentially move to different pages, Word will automatically update any cross-references for you
To create a cross-reference, follow these steps:
- Open Microsoft Word
- To open an existing document you wish to use for this exercise, press Ctrl + F12 on the keyboard, the Open dialog box will appear, locate the file and select it, then click Open
- Move your cursor to the location you wish to insert the first cross-reference
- If you wish to type some text to make it easy to see where the reader should click, type the text now
- I’m going to put my cross-reference inside brackets as shown below however, you can format the cross-reference however you prefer:

- Click the References tab from the Ribbon
- Click the Cross-reference button within the Captions group

- The Cross-reference dialog box will appear:
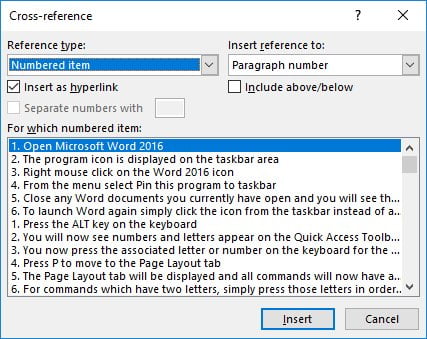
- You have the ability to include a cross-reference to many different reference types, including headings, footnotes, tables, numbered lists etc
- From the Reference type drop-down, select Heading
- You will see all the headings within the document where you have applied a “heading” style e.g. Heading 1, Heading 2 etc
- From the Insert reference to drop-down menu, select what you want to link to e.g. the actual heading text, the page number etc
- For this example choose Heading Text
- Now scroll through the For which heading list and locate the heading which you wish to cross-reference to
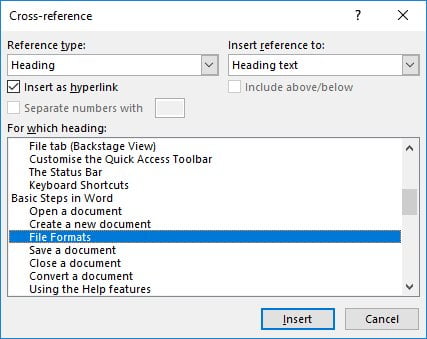
- Click Insert
- Now I want to also include the page number so change the Insert reference to drop down menu to Page number and repeat the process to insert
- Click Close to return to your document
- I now have 2 x cross-references included in my document

- Using the arrows on the keyboard, move the cursor between the heading text and the page number. You will see these two cross-references will be displayed as a grey box so that you can identify them easily
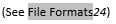
- Between the two references, type the text on Page and put the final closing bracket if needed (I also formatted my cross-references in italics text):

- If you hover your mouse over either cross-reference you will see a screen tip to hold down the Ctrl key and click to follow the link
- Test your cross-references are working correctly
- Don’t forget to save your changes, you can use Ctrl + S on the keyboard as a shortcut
I hope you have found this post on cross-references in Word useful. Click here to see more articles on Microsoft Word. Like shortcut keys? Check out my favourite shortcuts for Microsoft Word.