

When we are forced to spend vast amounts of our working day using email, it is important that we are able to configure and utilise the features to the best of our ability. Often it’s the small things that can make the biggest difference to how smoothly our working day goes.
Today I want to show you how to adjust the way the email address of any of your Contacts in Outlook is presented. The start of a new year often brings with it the drive to adjust how we work, to simplify and streamline. I would often implement new ideas or goals at the start of a year which had been on my mind for some time but had been lowered down on my “to-do list”. This is one of those things that can help you work smoother and faster.
When we are working with different contacts in Outlook, we are dealing with the basic information we need to access: name, email address, phone etc. These days we are often dealing with multiple options for this type of information. A contact may have a home email address, a work email address and often even a “freebie” address like Gmail.
One annoyance that I’ve encountered many times both during training and also when assisting clients is the ability to see the email address of the person we are emailing. Often Outlook will just display the name for us but it can be quite useful to be able to view the name and email address without having to double-click it by opening the Contact card. This is particularly important when a contact has multiple email addresses and you want to ensure you are sending your message to the most appropriate one.
Let me show you a very easy way to adjust how Outlook displays your Contact names when sending email messages.
To change the display of a contact name, follow these steps:
- Open Microsoft Outlook
- Select People from the Navigation Pane or press Ctrl + 3 on the keyboard

OR

- Within the People area locate the contact you wish to adjust the display setting for
- The Contact Card will be displayed
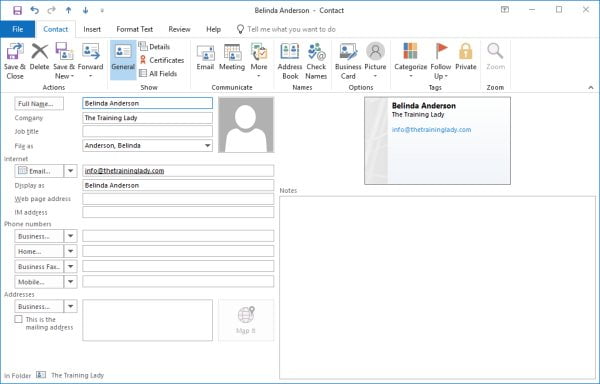
- You will notice a field under Email called Display as:
- This field determines how you will see this Contact’s name displayed in an email message
- If you want to include the email address, simply highlight the current text and press Delete
- Now press the Tab key on the keyboard and Outlook will automatically fill the field with the person’s name and email address in brackets
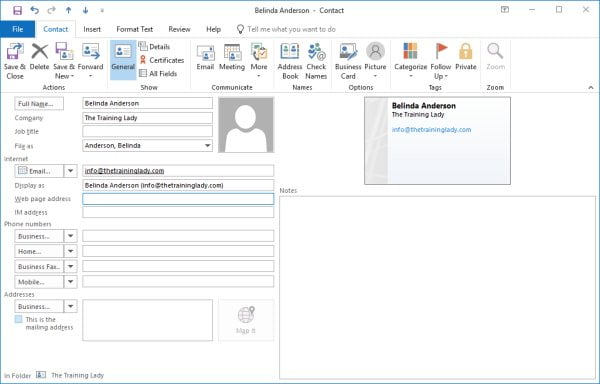
- Click Save and Close
- Return to the Mail section of Outlook using the Navigation Pane or press Ctrl + 1 on the keyboard
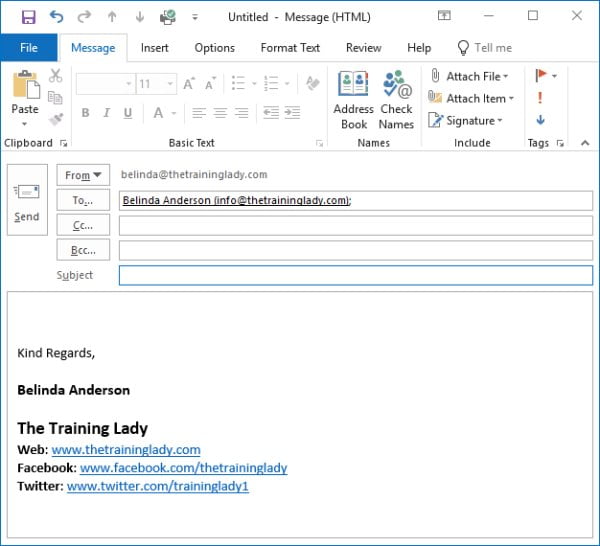
- Press Ctrl + N to create a new mail message
- Type the person’s name into the To field and Tab to move to the next field or press Ctrl + K to perform a Check Name
- The contact’s name should now be displayed with the email address included
- Fill in the remaining sections of your email message and send when completed
I hope this provides a little time saver for your day.
Did you know about the shortcut keys I mention in this article? Click here to see my favourite shortcut keys in Outlook.
If you like customising Outlook to work better for you, try the following articles:
- Using AutoCorrect within Microsoft Office,
- stay updated on your favourite websites by adding an RSS feed to Outlook, and
- don’t forget that you can create your own distribution list in Microsoft Outlook.


6 Responses
Using Outlook 365, when I type in the name, it always shows only the name without the email address even though I have updated the “display as” field. I’ve been doing that for 25 years for the same reasons you highlight. Any others suggestions?
When you start typing the name and it shows the list of options, click the X next to the contacts details which do not display the email address. Close the email message and try again and it should hopefully refresh.
For the reasons you mention, I love seeing the email recipient’s name as well as their email address — especially for those people for whom I have multiple email addresses!
Is it possible to set the default to always include the name and email address?
Since I prefer to always see both, a default setting would save manual effort,
Thanks,
John
Did you get this default resolved, John? I am looking for just that.
I have fond that if I enter an email address in the Contact’s Email field and then tab to the DisplayAs field, then it inserts the email address only. However if I ten delete everything in the Display As field (leaving it blank) and then tab out of that field, then it auto-fills with exactly what I want, which is Fullname (email-address)
I would like to do just the opposite–show only the contact’s name in the Display As. Hopefully, I can re-engineer your instructions above. But if you’d be willing to tell me how to do it, I would be most appreciative!
Hi Marlyn,
In the Display As field, simply delete out the email address leaving just the contacts name in the field. Save and close and then you should just have the name displayed.
Thanks, Belinda