

Being able to represent content in a graphical way can add immense meaning and visual appeal to any presentation. I always find that graphics can portray information in a better way than a screen full of text and for that reason, I love the use of SmartArt. Like any feature in Microsoft Office, it needs to be used with some restraint, having a presentation with 20 slides containing 20 SmartArt graphics isn’t going to help anyone, but when used in the right context they can give your information the visual representation it may need.
Many users confuse SmartArt with the Charts feature often used in Excel and other applications, however, unlike Charts, SmartArt does not rely on data in the document which it then uses to create a visual representation. SmartArt is 100% graphics based and does not need the information to be located anywhere within your document or presentation, you add it manually directly into the graphic.
SmartArt provides great flexibility so that you can customise the way it looks, how many shapes it contains, colour schemes etc. I have used SmartArt for pie charts, organisational charts and much more.
In a previous post, I have looked at how to convert text already contained within a presentation into SmartArt without the need to retype it. You can check it out here.
To insert a SmartArt graphic, follow these steps:
- Open Microsoft PowerPoint
- A new blank presentation will be displayed with a Title Slide displayed:

- Now let’s insert a new slide for us to place our SmartArt graphic
- From the Home tab select the New Slide button and choose the Title and Content slide layout OR press Ctrl + M on the keyboard
- A second slide will be displayed
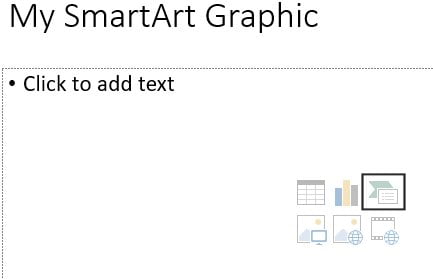
- At the top of the slide, you can include your own title, such as My SmartArt Graphic
- In the Content area of the slide, you will see six (6) content options, one of those is the SmartArt graphic icon, click on it to insert a new SmartArt graphic:
- The Choose a SmartArt Graphic dialog box will appear:
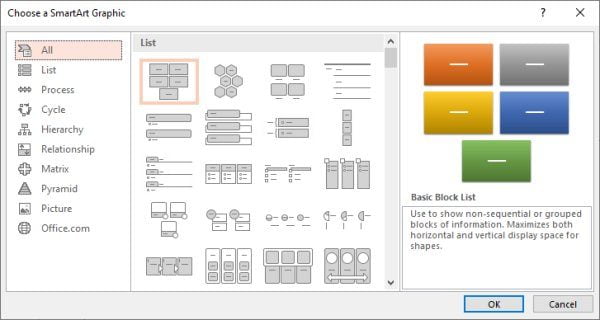
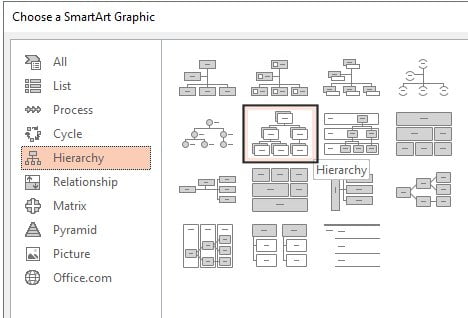
- You will see the various categories shown on the left side of the dialog box
- Scroll through the options to see what is possible, then select the Hierarchy category and choose the Hierarchy option then click OK
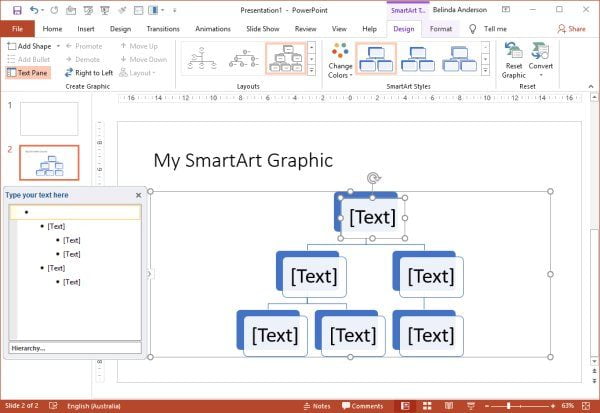
- The SmartArt graphic will now be inserted
- You will now see you have two new tabs appearing on the Ribbon, the SmartArt Tools Design and Format tabs. These are contextual tabs, so are only visible when you have the SmartArt graphic selected. Once you deselect or click off the SmartArt graphic, these tabs will disappear.
- Beside the SmartArt graphic you will see the Text pane which allows you to add text into each shape:
- Alternatively, you can type directly into the shapes rather than using the Text Pane
- Now click on the first bullet point in the Text Pane, this represents the highest shape in the hierarchy
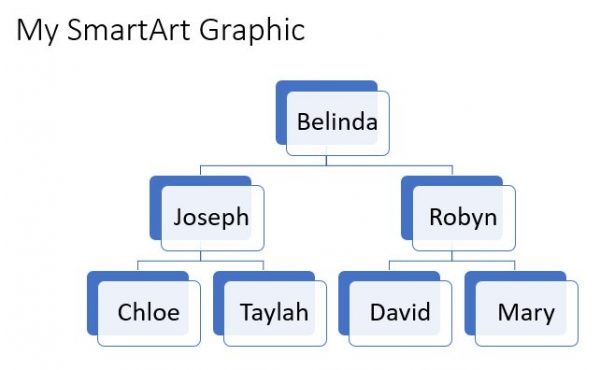
- Enter the text you wish to display, for my example, I am going to create an organisational chart
- Now click in the next bullet point and enter text for the shape
- Repeat this process to add text for each shape displayed
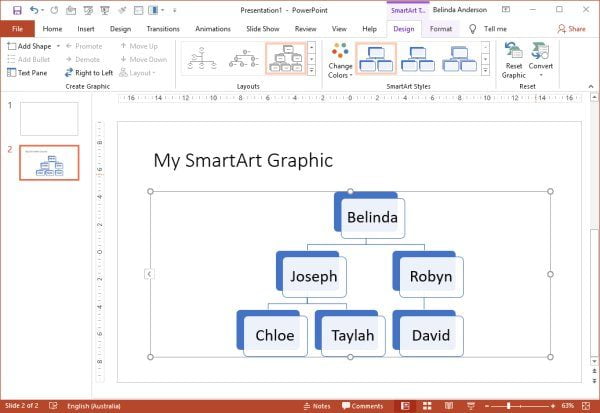
- Let’s say we need to add another person reporting to Robyn however there is only one shape displayed below
- To add a new shape ensure that the Shape for Robyn is selected or if using the Task Pane, select Robyn from the bulleted list
- Select the SmartArt Tools > Design tab
- Click the Add Shape button and choose Add Shape Below
- You will now see a new shape appear allowing you to add another member:
- If you are using the Task Pane, place your cursor at the end of the last persons’ name, press the Enter key
- Just like it creates a new bullet point in other Office products, here it will insert a new shape and allow you to add another person
Moving people around the SmartArt
A common question I receive in training sessions is how to move people around the organisational chart. People may move departments, change who they are reporting to, are promoted etc. SmartArt allows you to move people around without having to delete their shape and recreate it elsewhere.
- To move someone, select the shape from the SmartArt graphic or select their name in the Task Pane list
- Select the SmartArt Tools > Design tab
- From the Create Graphic group, you will see buttons to Move Up and Move Down. Use these to change the position of the person in question
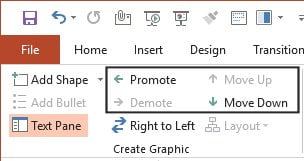
- If someone is promoted, or demoted (eekk), use the Promote and Demote buttons which will ultimately change the level which their bullet point sits on within the Task Pane
I hope you have enjoyed this introduction on how to insert a SmartArt graphic into PowerPoint. Be sure to check out my other Microsoft PowerPoint articles here.


