

A common concern for any presenter (including me) is knowing if they have enough content or too much in their presentation. The Rehearse Timings feature in Microsoft PowerPoint provides a quick and simple way to rehearse the timing of your presentation. This helps to gauge if your content needs more detail or you need to reduce it. When presenting, I have always had an allocated duration that my presentation would run for. I don’t want to have too much content which may cause me to rush, but I also don’t want to get through the details too quickly and finish too early.
When using the rehearse timings feature in PowerPoint, it is important to remember that it is a guide only. You are rehearsing the time it will take for you to cover your content from start to finish without any pauses. At the end of your rehearsal, you have the option of saving the timing to your presentation which can then be used to automate the transition of your slides. Although this works well in some presentation instances, in my personal experience I much prefer to advance the slides myself. This allows me to answer questions or provide more information about a topic if prompted by the audience.
Let’s get started
To use rehearse timings in PowerPoint , follow these steps:
- Open Microsoft PowerPoint.
- Open the presentation you wish to work on or create a new Blank Presentation and add some sample content.
- Select Slide Show > Rehearse Timings.
- Microsoft PowerPoint will now launch the presentation in slide show mode along with the Rehearsal toolbar:

- The Rehearsal toolbar will begin timing your presentation, so get started and begin rehearsing your presentation:

- Go through what you plan to say on Slide 1 of your presentation.
- Once you have finished on Slide 1, allow a few additional seconds, then click the Next button on the Rehearsal toolbar:

- Slide 2 will now be displayed, allowing you to go through the content you will discuss on Slide 2.
- Repeat the process for all remaining slides, using the Next button to move to the next slide. If you wish to pause to think for a moment, click the Pause button from the Rehearsal toolbar.
- Once you have completed the entire presentation, you will see a message asking you if you wish to save the slide timings:
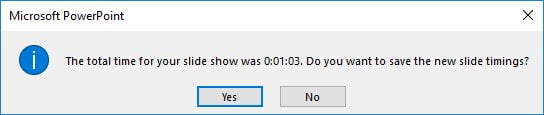
- To keep the timing, and use them to automatically advance your slides during your presentation, click Yes.
- If you do not wish to use them, make note of the total time it took to complete the presentation and then click No.
- If you kept the slide timings, select the first slide and go to the Transitions tab. Check the Advanced Slide After setting. The rehearsed timing duration will now be set on each slide:
- To test the rehearse timings select Slide Show > From Beginning or press F5 on the keyboard
Manually set Advance Slide
If you wish to use a different approach for the transition of your presentation, you can manually set the time period for each slide via the Advance Slide After setting.
To manually set the slide transition, follow these steps:
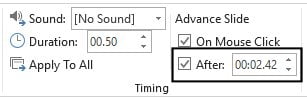
- Select the Transitions tab and locate the Timing group displayed on the right side of the Ribbon.
- You will notice that the After option is already enabled and that the duration that we set in the Rehearse Timings option is displayed.
- You can manually change the amount of time that PowerPoint will wait before automatically advancing to the next slide.
- Go through each slide and edit the After setting (displayed in minutes:seconds with 2 decimal places e.g. 00:02.50 is 2.5 seconds).
- If you wish to use the same setting for every slide, specify the time period and click the Apply to All button.
Note: When applying an advance slide option to all slides any settings which have been set for slide transition effects will also be applied to all other slides
- Once you are finished, test the settings by running your presentation in Slide Show by pressing F5 on the keyboard.
Advance slides yourself
I prefer to advance the slides in a presentation myself. This gives the greatest flexibility so that if I am asked a question, or I think of additional information, I have the freedom to do so without worrying about the timing of my slides. I am more focused on connecting and engaging with my audience.
To manually advance slides, follow these steps:
- Select the Transitions tab from the Ribbon.
- Within the Timing group deselect the After option and leave only the On Mouse Click checkbox enabled.
- Click Apply to All.
- Test your presentation by pressing F5 on the keyboard, your slides should only advance if you click the mouse or press the space bar on the keyboard.
I hope you have picked up some new tips on using the Rehearse Timings feature in PowerPoint. Remember to have fun and enjoy your time presenting!
Some other relevant posts to help you create an amazing presentation are: Easily reuse slides from existing presentations, Preview a slide show in PowerPoint, and Create speaker notes in your presentation.
What are some other techniques you use to prepare for a presentation? Comment below.


2 Responses
I have set the timings on my slides in the PowerPoint presentation. But when I save the file as a PowerPoint show, the timings are not always the same as they are marked. This is especially important when I am using a song in the background and wish the slides to change at an exact moment. Why are the timings different When I save it as a PowerPoint show.
I use only a few powerpoint slides (sometimes less than 15 or 20) to accompany a Bible study I lead. Sometimes we have a long discussion before I advance the next slide and then the laptop has stopped and I have to bring up the presentation again. Can I set the presentation so it will allow long pauses without closing? I advance the slides manually from a remote.