Many users of Excel will be familiar with the lookup functions called Vlookup and Hlookup. Many Excel users however, have not yet explored how to use Xlookup. Xlookup is an extension of the original VLOOKUP and HLOOKUP functions but removes some of the requirements that the Vlookup and Hlookup have. A few key differences include:
- XLOOKUP does not require the table_array to be in ascending order by the first column.
- XLOOKUP defaults to exact match whereas VLOOKUP defaults to a “closest match” lookup.
- XLOOKUP allows you to add a custom message if a lookup value is not found.
- XLOOKUP does not require the lookup criteria to be in the first column of your table_array.
The XLOOKUP function is available to all Microsoft 365 subscription users. Unfortunately it is not available in older versions of Excel including Excel 2019.
Syntax
=XLOOKUP(Lookup_value, Lookup_array, Return_array, If_not_found, Match_mode)
| Lookup_value | The lookup_value is the value you are using as your lookup e.g. ID number, value. |
| Lookup_array | The lookup_array identifies where the lookup value can be found. E.g. Column F |
| Return_array | The return_array identifies where the returning value can be found. E.g. Column M |
| If_not_found | The If_not_found allows you to determine what happens if the Lookup_value is not found within the Lookup_array. This is an optional inclusion. |
| Match_mode | The Match_mode allows you to determine if you want the Lookup_value to be an exact match with several allowances or do you want to use a wildcard match. |
Create an Xlookup
- Open Microsoft Excel.
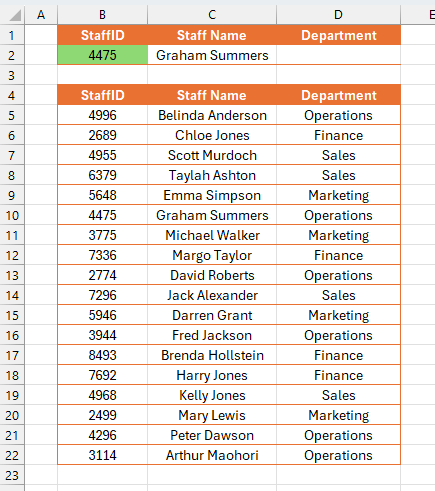
- Open an existing worksheet where you may want to include the XLOOKUP, or create a sample file as shown below:
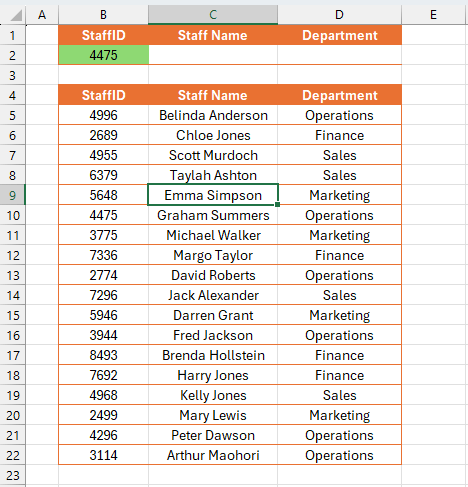
- In this sample you will see a list of staff with their staff ID, name, and department details. You will see at the top there is a section to enter the Staff ID and then have Excel lookup the name and department associated with that staff member.
- Click in cell C2 which is where we want the name displayed for the staff member.
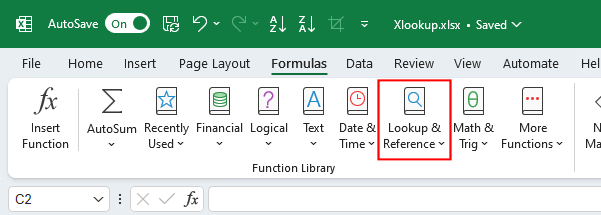
- Select the Formulas tab and choose the Lookup & Reference book from the Function Library:
- Select XLOOKUP from the list.
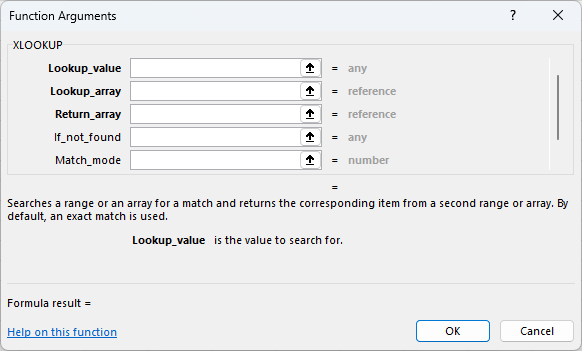
- The Function Arguments window will appear with the XLOOKUP statement ready to go:
- Click in the Lookup_value field. This is where you need to identify where the value is that you are want to find within the table. In this case select cell B2 which is where we will type the staff ID we want to look up.
- Click in the Lookup_array field. This is where you identify where the lookup values are located. In this case, where are all the staff ID’s listed in the worksheet. Select cells B5 to B22:

- Click in the Return_array field. This is where you identify where the returning details are listed. In this case, where are all the staff names listed in the worksheet. Select cells C5 to C22.
- Click in the If_not_found field. This section allows you to add a message to be displayed if the lookup fails. Enter whatever text you like:
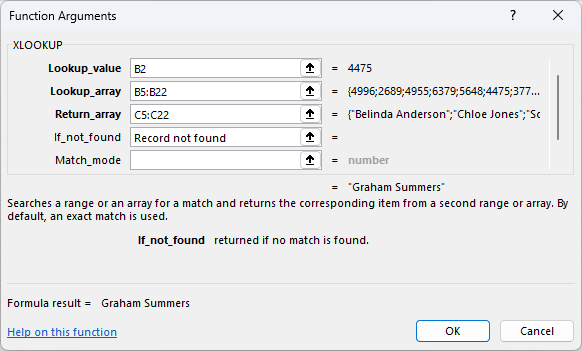
- The Match_mode field is provided if you need to change the type of lookup that is performed. By default, the Xlookup function performs an exact match lookup. If you enter a value that is not found in the lookup_array, it will give you an error message. Check the Help on this function link in the Function Arguments window to see the match mode options. For this exercise we can leave this empty.
- Click OK.
- You should see the name associated with the staff id displayed:
- Repeat the function to create the XLOOKUP to look up the department details.
Xlookup Examples
Now that you’ve created, possibly your first Xlookup, here are some examples to give you some ideas of how to use Xlookup within different scenarios.
- Staff Database: This is exactly what we’ve just seen in action in the above exercise. Xlookup can quickly find staff or employee details such as name, department, and contact information.
- Sales and Inventory Management: Xlookup can help match product IDs or names with their corresponding sales figures, inventory levels, or prices, for better decision-making and inventory control.
- Financial Analysis: Xlookup can assist to analyse financial data by retrieving specific information like transaction amounts, dates, or categories, making it easier to track expenses or revenues.
- Student Grades and Performance Tracking: Xlookup can be utilised to retrieve student grades, attendance records, or exam scores from a student database, making the process of monitoring progress much quicker and easier.
I hope you’ve enjoyed learning about the Xlookup function in Excel. Feel free to comment below with any questions.