

This week I had a request to show how to join text together from different columns in Excel. For this example, the Concatenate function in Excel works perfectly as it allows you to join strings of information together dynamically.
The term “dynamically” means that if any data in the original location changes, our Concatenate function will also pull that new information into our cells, therefore, creating dynamic content. The meaning of the word concatenate is to join things together, and that is exactly what concatenate in Excel will do for you.
If you are entirely new to using functions in Excel then be sure to check out my post on Formula Basics in Excel.
Concatenate Syntax
All functions in Excel have a syntax. This refers to the way in which the function is formatted – in other words, where you need to place a bracket or a comma. Below is the Excel Countif syntax.
=CONCATENATE(text1,text2,…)
How to use Concatenate
The Concatenate function is going to allow us to join information from multiple cells into one single string of text. There are other ways to perform this in Excel however the biggest advantage to Concatenate is that it is dynamic. Remember, the term it dynamic means it will refresh itself if your original information changes.
To use the Concatenate function, follow these steps:
- Open Microsoft Excel.
- Open an existing workbook containing data you wish to join together or create a simple new workbook with data such as shown below. I am going to join together the house number and street name into one cell.
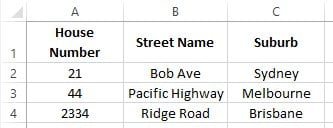
- Place your cursor in the next available empty cell in a blank column or insert a new column if needed. I am placing my cursor in cell D1.
TIP: To insert a new column, place your cursor where you want the new column to be displayed, then from the Home tab click the Insert button and choose Insert Sheet Column.
- Enter a heading for the new column and press Enter.
- You should now be in the cell which will contain the first set of joined text.
- Select the Formulas tab from the Ribbon and choose the Insert Function button, in the Search for a function box type Concatenate and click Go.
- Select Concatenate from the list and click OK.
- The Function Arguments dialog box will now appear:
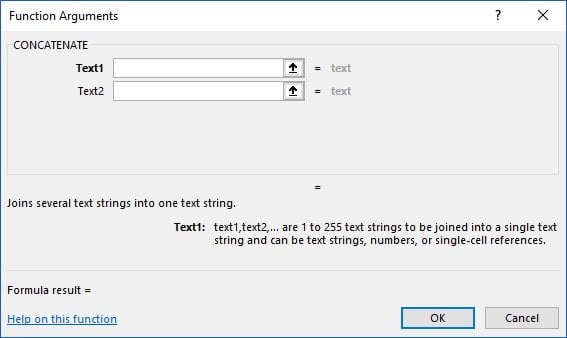
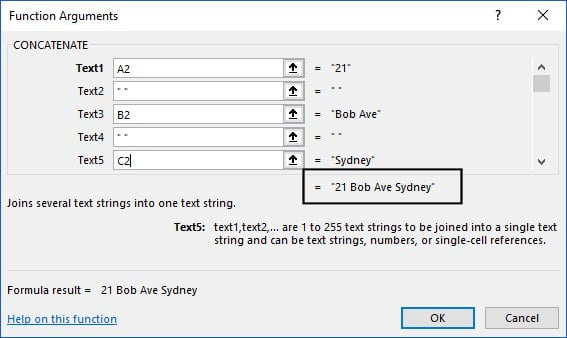
- In the Text1 field, we need to select the location where the first part of the text can be found, in this case, the house number will be the first part and can be found in cell A2, use your mouse to select cell A2.
- So that Excel puts a space between the house number and the name of the street, you need to include a space character. If you selected the cell with the street name as text2 without first putting in a space character then Excel will display the two pieces of text with no spaces between.
- Place your cursor in the Text2 field and type a space using the spacebar.
- You will now see Text3 and Text4 will be displayed.
- Place your cursor in Text3 and then select the location of the next part of text, the street name, or cell B2.
- Repeat the previous step and place a space into the Text4 field.
- In Text5 this will contain the suburb, so select cell C2.
- The Function Arguments dialog box will display a preview of your data:
- Click OK.
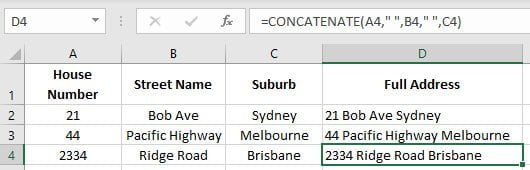
- The cell will now display the data joined together.
- Autofill the formula down the remainder of the column using the AutoFill tool – see my post Introduction to the AutoFill Tool.
Important Note: If you delete column A, B or C which contain the individual information, column D will display an error so you must leave them in the spreadsheet. For visual purposes if you wish to have these out of sight, simply highlight the two columns, right mouse click and select Hide.
- Have fun using this function to combine text strings.
Test the Concatenate function
Let’s test out the dynamic updating of the Concatenate function.
- Place your cursor in any cell within column A (containing the house numbers).
- Change the value to something different.
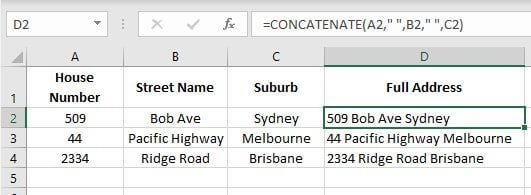
- The Concatenate function in column D automatically updates the data.
The CONCAT Function in Excel 365
In the latest version of Excel which includes Excel 2019 and Excel 365, the Concatenate function has been replaced by the CONCAT function. The Concatenate function still remains available to use for compatibility purposes with older version of Excel however the new CONCAT function is now the go-to option.
CONCAT Syntax
All functions in Excel have a syntax. This refers to the way in which the function is formatted – in other words, where you need to place a bracket or a comma. Below is the Excel Countif syntax.
=CONCAT(text1,text2,…)
Using the CONCAT function
The CONCAT function is really very much the same process to its predecessor Concatenate.
- Open the worksheet where you wish to join text strings
- Place your cursor in the cell which will contain the first set of joined text
- Select the Formulas tab from the Ribbon and choose the Text library button, choose CONCAT from the list
- The Function Arguments dialog box will now appear:
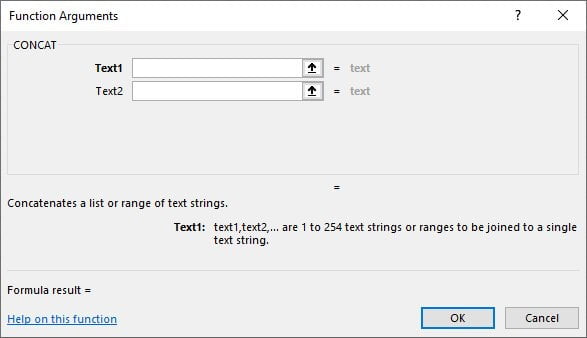
- In the Text1 field, select the cell where the first part of the text can be found, in this case, the house number will be the first part and can be found in cell A2, use your mouse to select cell A2
- So that Excel puts a space between the house number and the name of the street, you need to include a space character. If you selected the cell with the street name as text2 without first putting in a space character then Excel will display the two pieces of text with no spaces between.
- Place your cursor in the Text2 field and type a space using the spacebar
- You will now see Text3 and Text4 will be displayed
- Place your cursor in Text3 and then select the location of the next part of the text, the street name, or cell B2
- Repeat the previous step and place a space into the Text4 field
- In Text5 this will contain the suburb, so select cell C2
- The Function Arguments dialog box will display a preview of your data:
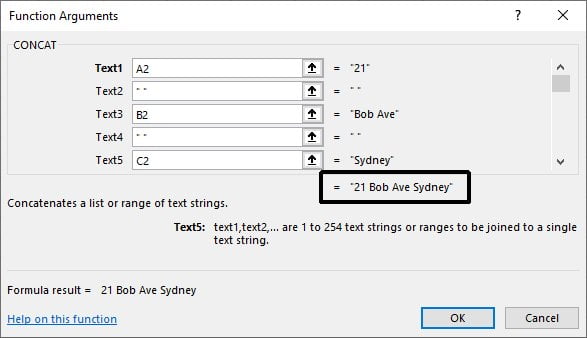
- Click OK
- The cell will now display the data joined together
- Use AutoFill to copy the function down the remaining records in your worksheet
Other Excel Functions
If you want to venture into the world of some other great formulas in Excel you may like to see the following articles: