Folders are an important feature of any computer as they allows users to organise and store files in a logical way. A folder is a container for files and other folders, and it can be used to group related files together.
You can create Folders to group files by project, category, or any other logical grouping. For example, you might create a folder for your work-related documents, another folder for personal photos, and another for music.
Here are some reasons why the use of folders is important:
- Organise files: Folders can be used to group files by project, category, or any other logical grouping. Folders can also be used to create a hierarchy within your filing structure. Create sub-folders within other folders to allow you to store files in a logical way.
- Access files quickly: Folders can also be used to access files quickly. By organising files into folders, you can locate a file easily without having to search through all the files on your computer.
- Back up files: Folders can also be used to back up important files. By storing all your important files in one folder, you can create a backup copy of the folder to an external hard drive or cloud storage service.
- Share files: Folders can also be used to share files with others. By creating a folder and granting access to others, you can share files and collaborate on projects.
Using the File Explorer in Windows 10
File Explorer is a core component of the Windows operating system and provides a simple user interface to access and manage files and folders on your computer. It also allows you to perform tasks such as copy a file, move a file, rename or delete a file, and search for files.
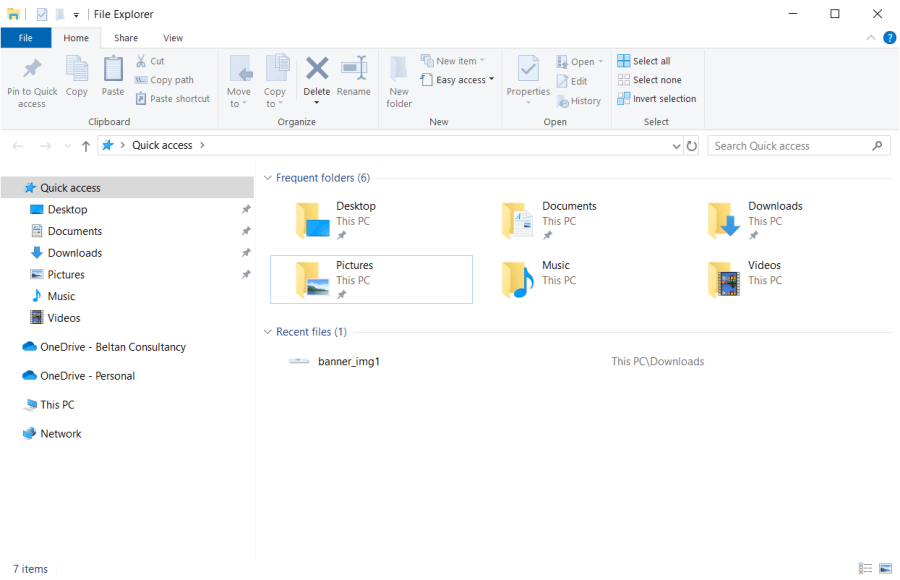
File Explorer also includes features such as Quick access; where you can Pin your favourite or most frequently used folders, access to OneDrive and also access to your entire PC to view how much free disk space is available and view or access other storage devices such as a USB drive.
Create a new folder in Windows 10 or Windows 11
Both Microsoft Windows 10 and Windows 11 versions provide an easy way to create new folders on your computer.
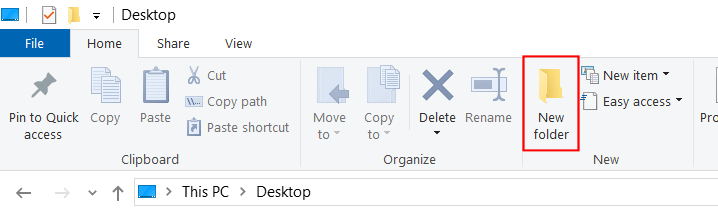
To create a new folder in Windows 10 and Windows 11, follow these steps:
- Open File Explorer using the shortcut Windows key + E.

- Navigate to the location where you want to create the new folder. This could be on your desktop or within a specific directory in your filing system.
- Select the New folder button from the Home tab on the ribbon:
- Alternatively, you can also use the keyboard shortcut Ctrl + Shift + N to create a new folder.
- A new folder will appear, type in a name for the new folder:
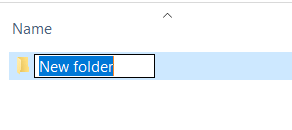
- Press the Enter key to save the new name.
Move files into a folder
Windows will allow you to easily move files into a folder. Maybe you saved files into one location and now you need to move them to a new location. There are two techniques you can use to acomplish this: drag and drop the file into the folder or use the Cut function to remove a file from one location and then Paste it to a new location.
To move a file into a folder using drag and drop method:
- Open File Explorer using the shortcut Windows key + E.
- Locate and select the file you want to move within File Explorer.
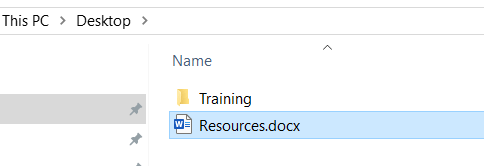
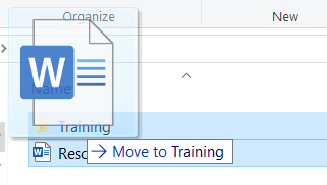
- If you can directly see the new location within File Explorer, select the file using the left mouse button and drag the file and drop it onto the new location. E.g. select the Resources.docx file and drag it into the Training folder.
- You will see a prompt appear to let you know that you are going to Move to folder:
- If you CANNOT see the new location, open another File Explorer window and navigate to the destination folder – ensure you can see both locations on the screen.
- Click and hold the left mouse button on the file you want to move.
- While holding the mouse button, drag the file to the destination folder.
- Release the mouse button to drop the file into the folder.
The Cut function will remove, or cut, the file from the original location and then allow you to move to the new location and Paste the folder in place.
- Open File Explorer and select the file you wish to move.
- Click the Cut button from the Ribbon or press Ctrl + X on the keyboard.
- Navigate to the new location you want to move the file to.
- Click the Paste button from the Ribbon or press Ctrl + V on the keyboard.
- The file will now be pasted into the new location and removed from the original.
Rename a folder
If you create a folder and then need to change the name at a later date, you can easily rename the folder. The same applies for individual files if you need to rename them at any stage.
If you wish to rename a folder, follow these steps:
- Open File Explorer and select the folder you wish to rename.
- Click the Rename button from the Ribbon.
- The name of the folder will now be highlighted.
- Type directly over the original name and type in the new name for the folder.
- Press Enter when you have finished typing.
- The folder will now be renamed.
Folders play a crucial role in maintaining a well-organised and efficient filing system. Using the File Explorer in Windows 10 or Windows 11 provides you with a user-friendly interface to complete these tasks. Whether creating new folders, moving files, or renaming folders, the functionalities provided by folders contribute significantly to a streamlined and productive computing experience.