

This week I am presenting a few sessions at the Leading a Digital School Conference being held in Melbourne, Australia. This post outlines my second session which is going to show you how to create an online quiz using Microsoft Forms. This is a bit exciting because this post is my first for Microsoft Forms – I generally only blog about the Office products, but I feel this is a good starting point to include some of the other great Microsoft 365 tools into my blogging scope.
For links to my other conference sessions, click here.
What is Microsoft Forms?
Microsoft Forms is an online tool which provides users with the ability to create an online quiz, survey, collect feedback, measure employee satisfaction, organise events and much more. The responses are collected within the Forms online portal and you can then access statistical information relating to the data. This is an amazing tool for educators and businesses alike.
Microsoft Forms is part of the Microsoft 365 family of products and is accessible as a browser-based tool – there is no downloadable app or program.
Log in to Microsoft Forms
To create any Forms you will first need to log in to the Microsoft Forms online portal.
- Open a web browser.
- Enter the address https://forms.microsoft.com.
- Click the Sign in link in the top right-hand corner.
- Sign in with your Office 365 login username and password.
- The Microsoft Forms homepage will be displayed:
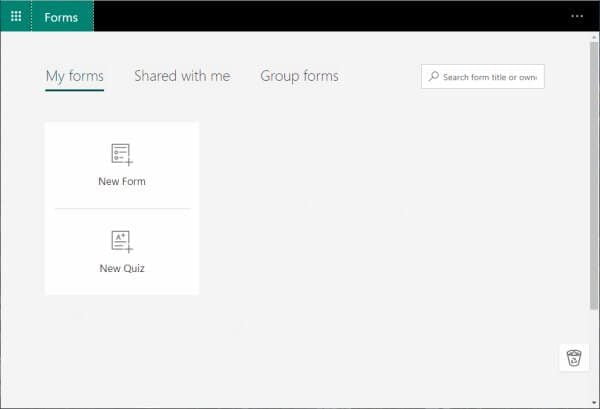
There are two types of forms you can create: a form or a quiz. There are a few differences between the two types:
- A form can be used to collect feedback, conduct surveys, accept signups, peer collaboration, and lots more.
- A quiz can be used to assess student learning, provide instant results and feedback, conduct a quiz and more.
Create a Quiz
Firstly we are going to create a basic quiz which will provide students with an instant result and score.
- Click New Quiz.
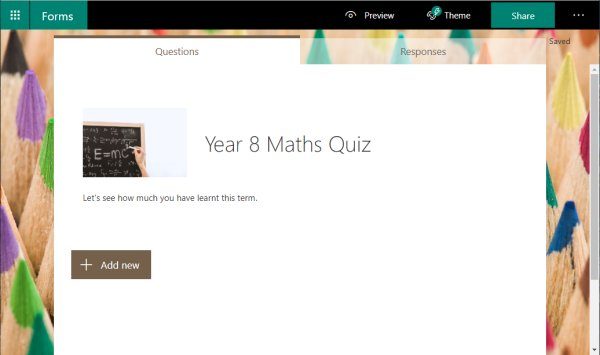
- A new blank quiz will be displayed.
- Let’s set up a few basics including the title, description and an image for our quiz.
- Click the Untitled Quiz text to change the title:
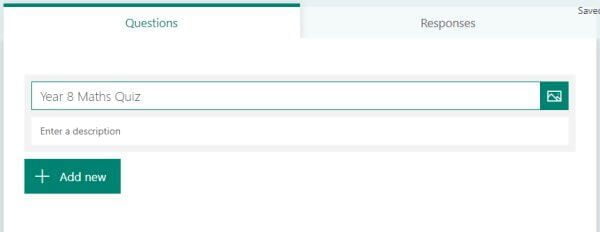
- Enter a description to give the end-user an idea of what the form is about or some instructions if needed.
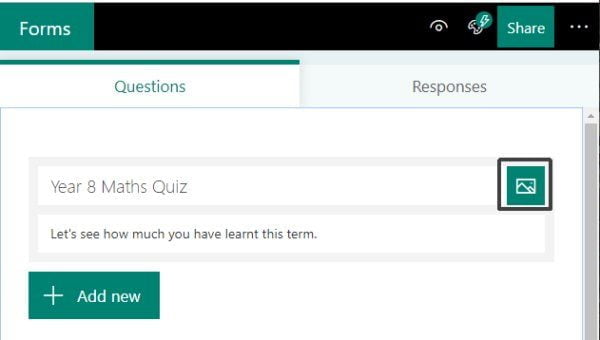
- Now let’s set an image to use for our quiz, this could be a logo, header image or just an image associated with the topic of your quiz.
- Click the Insert Image button:
- You have the option of searching for an image using Bing, accessing images you have stored in your OneDrive account, or uploading an image from your computer.
- I am going to upload a free stock image I found via pexels.com so I will select the Upload option:

- Locate the image you wish to use, select it and click Open.
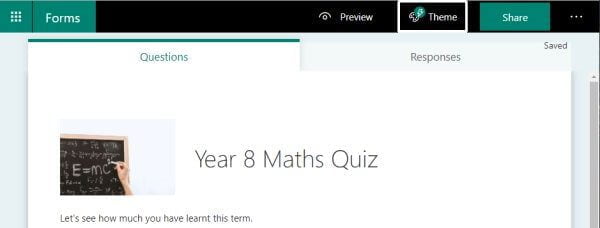
- The image will be added to your quiz header area:

Apply a Theme to your quiz
One way to jazz up the look of your quiz form is to apply a theme. The theme allows you to customise the background area of your form either with a solid colour or with a background image. Microsoft Forms will allow you to use their built-in Theme Ideas or upload your own image.
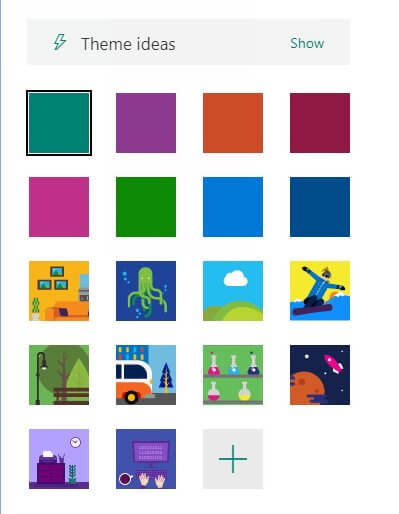
- Click the Theme button:
- The Theme Ideas pane will appear. The magic in this section is that the theme ideas will customise depending on the title of your quiz. Experiment if you like by changing the topic of your quiz to something completely different, then see the different theme ideas it provides you.

- Choose a Theme you like for your quiz.
- If you would like to use a solid colour or even upload your own image to use as the background, click the Hide link in the top right corner of the Theme Ideas pane.
- There will be options for solid colours along with some additional themes. You will also have the option to click the + button and upload your own image:
- You should now see the theme applied to your quiz:
Add a text-based question
Now to add questions to our quiz. Firstly we are going to create questions to collect the name and email address of who is filling in our quiz.
If you are using the quiz for students who are part of your main school Office 365 organisation unit, then the students’ details will automatically be displayed on their responses. If however, you are planning to quiz a mixture of people within your school organisation unit and external users, it is recommended to add fields to collect their name and/or email address. If you do not then each response will be labelled Responder 1, Responder 2 etc with no names associated.
- Click the Add New button to add the first text-based question.
- From the options select Text:

- A blank text question will appear:
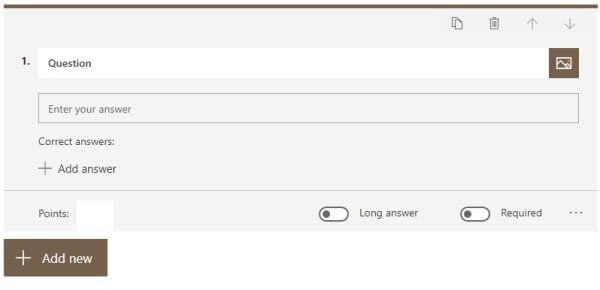
- Type the first question into the Question field e.g. Your Name.
- Repeat this and add a text question for Your Email.
- You may like to make both of these fields required, meaning that your students MUST enter their details.
- Click on a text question to open the editing options, click the Required button to enable it:
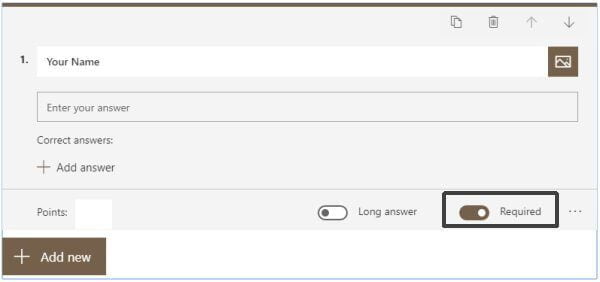
- Click outside the question area to close the editing screen.
A Text-based question allows you to assign an image to the question or add a list of correct answers. You can set the question to allow a long answer, or make the question a required field as we have done above. For more options, click the ellipses (…) button in the bottom right corner and enable additional settings such as Subtitle (add additional instructions or a prompt for the question), Restrictions (specify restrictions such as only allow a number between certain values), and Maths (allows you to enter a Maths equation).
Add a multiple choice question
We are going to use the Choice question type which will allow students to select from multiple-choice questions. We are also going to incorporate some images into some of our questions to work as a visual element to our question. Because we would like our quiz to automatically let students know their results, we are also going to assign points to each question and specify which question is the correct one so that the form can automatically let the student know their result.
- Click the Add New button.
- Select the Choice question type.
- A blank Choice question is displayed:
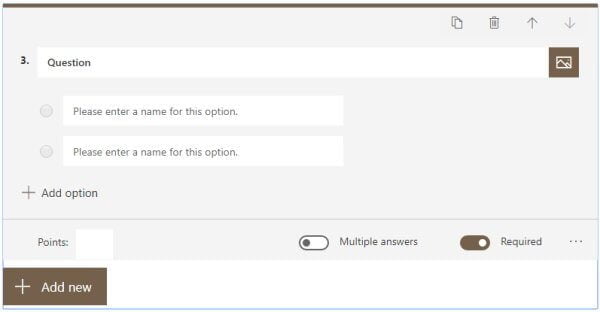
- Type the next question into the Question field.
- My first choice question has a visual prompt, so I need to add the image into the question. To do this click the Insert media button:
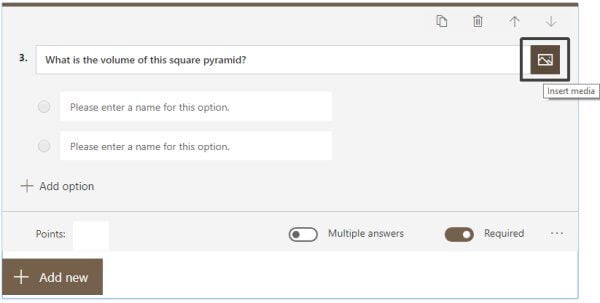
- From the Insert media pane select Image.
- Now select the source of your image, you can use a Bing search, select an image from your OneDrive, or Upload.
- I am going to choose Upload as I have the image saved on my computer.
- Select the image and click Open.
- The image will now be added to the question:

- Now add the answers into the fields provided.
- To add more answer options, simply press Enter at the end of the last answer or click the + Add Option button.
Assign points for each question
So that your quiz can be automatically marked, you need to indicate how many points each question is worth.
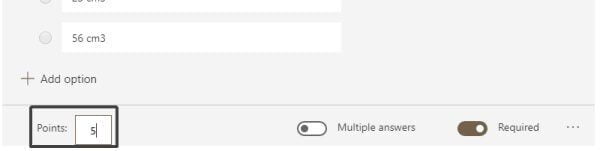
- From the question area, click into the Points field and enter the value for this particular question.
- I am going to allocate 5 points to each of the questions in my quiz:
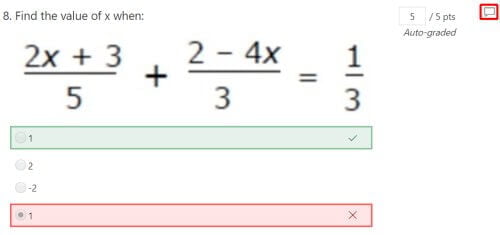
Assign which answer is correct
Our final step is to indicate which answer is the correct one so that the automatic marking process can function.
- From the question area, hover over the correct answer from the list.
- Individual options for that particular answer will be displayed.
- Here you can delete an answer, enter a message to be displayed if a respondent chooses that particular answer, or mark it as the correct answer:
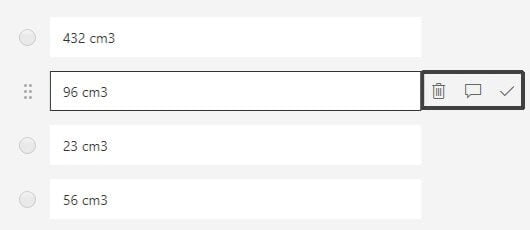
- Click the tick icon for the correct answer for your question.
- It will now display “Correct answer” next to the answer (this is not visible when respondents are completing the quiz).
- Repeat this process to create any additional multiple-choice based questions in your quiz.
Preview the Quiz
To preview the quiz and check what it will look like, click the Preview button on the main menu area.

Change Form Settings
There are various different settings you can customise which affect who can view your form, when it can be viewed and also what type of notification you will receive. You can also enable or disable the ability to display results for a quiz automatically.
- Make sure your Form is visible.
- Click the ellipse (…) button from the main menu area:

- Choose Settings.
- You can now enable or disable the Show results automatically setting:
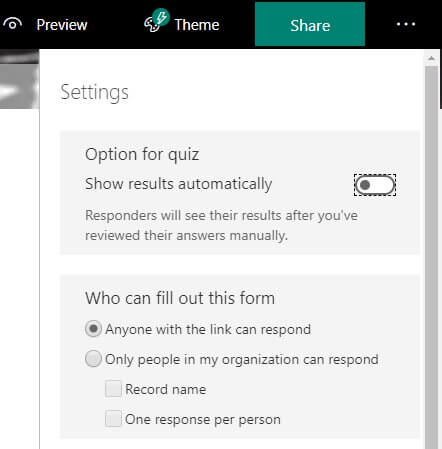
- By default, your form will be set to only allow people within your Office 365 subscription organisation to respond to the quiz. To open it up to anyone who has the link, select Anyone with the link can respond.
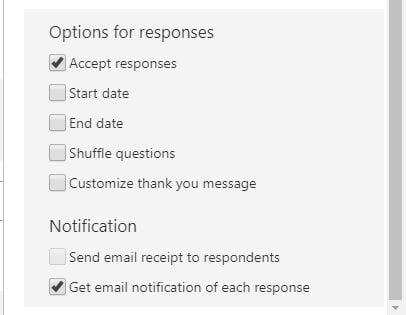
- Next, you can specify some additional options including the ability to set a start and end date for when your form will be open for responses, shuffle questions and also customise the Thank you message. Tick the options which apply if needed.
- Finally, you can specify some notification settings. If you would like students to receive an email when they have completed the form, select the Send email receipt to respondents. If you wish to receive a notification when someone fills out the form, select the Get email notification of each response.
Share your Form
Now it’s time to share your form so that you can begin receiving responses.
- With the form visible, click the Share button:

- You can again choose between having only people within your organisation/school to access the form or anyone with the link.
- There is an option to directly copy the Form link which you can paste into your preferred medium to distribute:
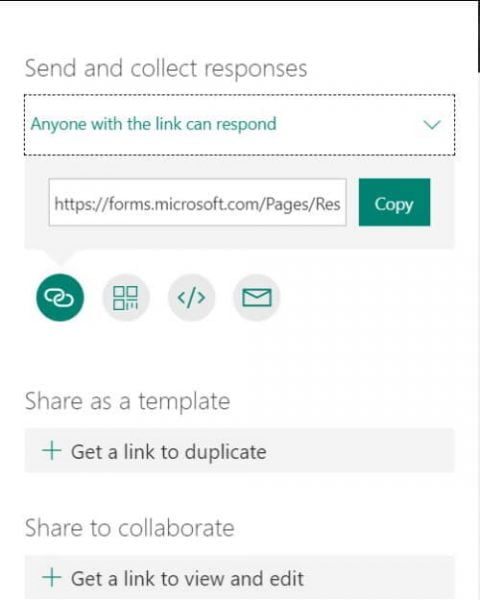
- Alternatively, you have 4 buttons which provide options for sharing your form: Link, QR code, Embed, or Email.
- A great way to share your form is using the QR code. Click the QR code button to download a .png image of the QR code. You can then insert their into your class notebook (OneNote) or add it to a PowerPoint slide where students can use a QR reader to immediately direct them to the Form link without having to type the link or rely on clicking the link via email. Below you can see I have included it in a PowerPoint slide to display for students.

- The Embed code will allow you to embed the form into any web interface such as a web page or include it in your Microsoft Sway story. Below I have added the embed code to this web page:
Review responses
Once you receive responses you will be able to review them, view analytics information and also make comments if you like. Students would have already received their result immediately after they submitted the form however this provides a way to provide explanations for incorrect answers or feedback. Students can still use the original link to them access their results and see the comments you have left.
- Open the Form.
- Click the Responses tab:
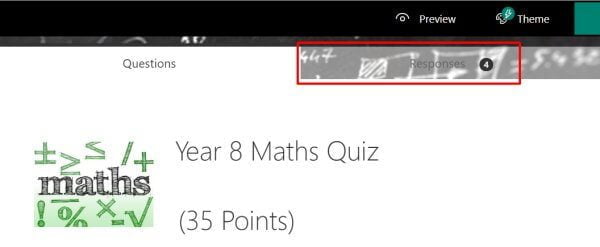
- You will see the total responses, average score, and status of your form.
- Scroll down to see results for each question along with some basic statistics such as number of correct responses.
- You have the ability to export this information to Microsoft Excel using the Open in Excel button:
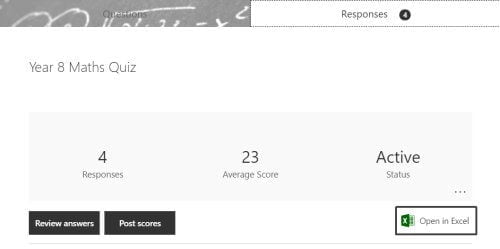
- To view one student’s responses at a time, use the Review answers button.
- To leave a comment or feedback on individual answers, use the Give Feedback button in the right corner of each question section:
I hope you have enjoyed this post on how to create an online quiz. You have also been able to collect responses and provided feedback. Microsoft Forms does provide several question types so experiment with those other types to see how you can create a completely customised quiz to meet your needs.
If you are interested in learning how to use Sections in your Form, check out my article here.


60 Responses
Hi Training Lady,
Thank you for this article! I have sent a quiz out, and have responses. Unfortunately, I had also sent the quiz out to some coworkers to test out. Now, when I try to analyze the results, I have their random responses included with the ones I’m actually interested in. Is there a way to delete some people’s quizzes? I know I can download to excel and delete that way, but I was hoping to be able to use the pie and bar graphs generated from responses. Thank you so much.
Hi Cindy,
Yes you can delete individual responses. Open the Form and click the Responses tab. Choose the Review answers button.
You will now see each individual response. Use the navigation buttons to scroll to the response you wish to delete.
Click the three dots (…) under the right navigation arrow and click Delete Response.
Hello,
Do you know if there is a way to have Quiz results linked to a live (not downloaded) excel file that maintains the Total Points column? Reason being, I would like to connect Quiz Total Point’s column to a PowerAutomate flow. If I track down where the live data is being stored in SharePoint, it does not include this column, only the offline downloaded copy has the total points column present.
Hi
Some of our quizzes have over 500 responses from mass use and we want to keep all responses. When I want to review and save a single user’s response, I go to Review Answers then have to keep clicking past each person’s response until I come to the one I want i.e. the latest user. Is there an easier way that you know of please?
Thanks
Mary
Hi Mary,
If you wish to review a specific response, it may be quicker to export the content to Excel and then use the search function within Excel to find the specific response.
Belinda.
Hi,
I would like to know if it is possible to reset a quiz. Some of my students already did the quiz, but they got a bad score. So, they want to take it again.
Hi Diana,
If you go into the quiz and select the “Responses” tab you can click the Review answers button. This will let you browse through each individual set of responses. Browse till you find the student in question then you will find a button with three dots (…) just underneath the score, click the dots and choose Delete Response.
Alternatively, you can leave that set of answers in the quiz and just have the student retake the quiz a second time.
I hope this helps.
Can microsoft forms still be used to create a quiz and be completed by people without having a microsoft account?
I want to use it for my gymnastics students but we currently use Zoom for all of our sessions. Would we be able to have a zoom call with myself asking the questions and have the children do the quiz at home on the forms?
Thank you in advance.
Hi Robyn,
Yes absolutely. When you share the form make sure you select that anyone with the link can complete the form. You will then be able to have students complete the form during your Zoom call. Ensure you include a field for them to fill out their name though.
Thanks, Belinda
I am inserting a knowledge check quiz about every 5 or 6 slides in a PowerPoint presentation. The presentation is recorded. Once they complete the knowledge check, is there a way to have the PowerPoint automatically (or with a button click) restart from the next slide?
Thanks
Is there any way to put a time limit on Forms quizzes? Essentially I want to allow a student 30 minutes to complete the quiz from the time they open it.
Hi,
At the moment you can only specify start and end dates/times. Forms does not let you specify a time period e.g. 30 minutes from the time you begin. This is a feature which has been suggested online so feel free to go here via MS Forms Feedback Portal and vote for this feature to be added. https://feedbackportal.microsoft.com/feedback/idea/fc11c270-d01c-ec11-b6e7-0022481f8945
Thanks, Belinda
Hi ! I have created a quiz in microsoft forms and now want to assign it to my students using microsoft teams. kindly guide.
Hi Ambika,
Once you have the form created, go into Teams and into the channel you would like to add the quiz. Click the + Add Tab button adjacent to the Posts, Files, and Wiki tab. From the Apps you will see Microsoft Forms, select that and then choose that you want to add an existing form. Add the form and it will then appear as a tab in your channel.
Hope this helps.
Belinda
Hi
One of my student was not able to submit her form in Ms forms.although she had done her all the answer very well.please suggest how I can saw and evaluate her paper.
Thanks
Hi Dolly,
In what way was the student not able to submit the form?
If this is a technical issue you may need to contact Microsoft directly for support for this.
Regards, Belinda
Hi. Is there any way that completed quizzes can be downloaded and saved? We like to keep a record of learner’s results in their file but I can’t find out how to do this. Thanks.
Hi Mary,
To keep track of learner results you can open the Responses via the Responses tab and then click “Open in Excel”. This will download a .xlsx file for you which you can then keep on record and use Excel analytics if you wish to filter etc. Hope this helps.
Regards,
Belinda
Hi Belinda
Thanks, that’s great for mass response saving. I’ve found out how to save individual results in PDF format by using the Print response option when in Review Answers. There is a Save as PDF option when you click on Print.
Next question please:
When a new response is received it goes at the end of any previous responses i.e. it will become one number higher e.g. it will be 296 when previous last response was 295. Do you know if there is a way to skip straight to the last response instead of having to click through 295 to get to the last one?
Thanks!
Hi Mary,
When you go into “Review Answers”, you will see a field with “Respondent 1” or the name of the first responder. This field is a drop down menu so you can open it and scroll straight to the bottom and select the last responder which will display those answers. Currently there is no other way to go to the last response. This is something you could suggest as a new feature via the Microsoft Forms Feedback Portal.
Belinda.
Can I reuse the quiz for another class and remove the previous response data?
Hi Debbie,
Yes, you can. From the main Forms window, click the ellipsis (…) button in the top right corner of the quiz you wish to duplicate. Choose Copy from the menu.
A new copy of the quiz will be created however it does not duplicate the responses from the original so you’ll have a quiz showing 0 (zero) responses. You can then edit as needed and send out to your next class.
Hope this helps.
From, Belinda
Hii!!
Just wanna ask..!!
Where the student will pen down his/ her details regarding name/subject/class/section??
Hi Neha,
I always just add a text field at the start of the quiz asking for “Student Name” and or “Student Email”. You could even ask for DOB if you want to be able to verify the student is who they say they are. This is then included in the quiz along with the responses.
Hope this helps.
From, Belinda
I’m building a survey in Forms. Is it possible for the respondent to enter an email address so that once they submit it, you can send the results to them? The respondents are not in my office 365 organization.
Hi Alex,
Absolutely. I always just add a text field at the start of the form asking for “Name” and or “Email”. If you are sending the form to people outside your M365 organisation you need to ensure you have selected “Anyone with the link can respond” from the Share screen. That way anyone can complete the form and they’ll be asked for name & email address details.
Hope this helps.
Thanks, Belinda
Once I have a form/survey created – can I edit some of my questions before sharing it? I do not see an Edit option on Forms.
Hi Laura,
You can edit as much as you like. From the main Forms screen, click on the Form you wish to edit. It will open up the Form in the edit mode and you can then click on any question and edit the details.
Thanks, Belinda
How is the start and end time calculated? I have noticed in a quiz given though students would all log in together that it shows that some students start time may be 30 minutes later and their end time is a minute later, then meaning they would take a minute to do the quiz. Can you help with that.
Second question, a few students said when they get back the answers that what they submitted is not what they see. Is that possible that their answers were changed?
Hi – I forgot to tick the correct answer and uploaded the quiz. When I go back into the quiz only the bin is showing next to each answer can I edit the quiz once sent.
Hi Catherine,
This is a little strange. You should be able to go back to the main Forms screen and click on the Form you wish to edit. Once the form loads you can then click on any question and it will allow you to edit the question, answers etc. You can change the order of questions, delete questions etc. Just make sure you are not previewing the Form as an end-user and you are logged in with your Microsoft 365 account to be able to edit.
Hope this helps.
Thanks, Belinda
Excellent article. There is an option to avoid other edit my quizzes? I made quizzes in Form, but other takes it and edit my quizzes and I lost the original one.
Hi Cruz,
You may need to check what settings you have in the “Share to collaborate” section of your Form. Open the Forms website and select the Form. Click the Share button from the top right corner and down the button check which settings you have for “Share to collaborate”. If there is a link there which allows you to copy it, then you may have shared it without realising. Click the Bin icon next to the link to delete it and stop sharing the Form.
Hope this helps.
Thanks, Belinda
Hi training lady, I am using the ms quiz – Likert skills and I have removed to icon done and not done ( I like to allocate one point for done and zero point for not done). I can only input the overall points and like to quantify the marks. Can this be doing ?
Hi Tina,
I don’t believe it is possible at this moment to allocate points based on the response within the Likert fields. It would be worth you suggesting this feature via the Microsoft Forms Feedback Portal.
Microsoft DO use the website for potential future updates.
Thanks, Belinda
Hello
Why cant I see the answer even if I enabled the Show Result Automatically in new browser?I can see the asnwer in preview mode.
Thnk you!
Hi Olaf,
Possibly check if logging out of your Microsoft 365 account helps. Fill out the form as a normal user would and see if the results are displayed at the end of the quiz/form.
Thanks,
Belinda
Whlle most staff have a work email address a handful of our volunteers don’t. Is there a way of sending them the quiz to their home email address even though I’ve selected our organisation only?
Hi Carol,
Yes you can still send the quiz to those outside your organisation. Within your form, go into the ellipsis (…) button in the top right corner and choose Settings. From there you can select “Who can fill out this form”. Ensure you choose “Anyone with the link can respond.”.
Thanks,
Belinda
Is there a way to add mathematical equations in line with the text. I am a physics teacher and most of the numerical type questions require me to type mathematical expressions in the text question itself. Now i cant find that option in forms. It is either completely text or completely math.
Hi Shubham,
At the moment the fields are specific to either text or numerical type. It is worth checking the Microsoft Forms User Voice website to see if anyone has suggested this feature, if they have you can vote for it also, or add it in as a suggestion. Microsoft Forms Feedback Portal
Thanks, Belinda
Is it possible to see the questions one by one due to their set-up times?
Can you make a math question where the answer accepts a range rather than an exact number?
Like what is the right pressure for your motorcycle tire?
the answer must accept any number between 25 to 35psi
Hi Diego,
I don’t believe you can add that type of answer at the moment. It is worth checking the Microsoft Forms User Voice website to see if anyone has suggested this feature. If they have you can vote for it also, or add it in as a suggestion. Microsoft Forms Feedback Portal
Thanks, Belinda
How do I set the time for the test if I am in a different time zone than my students or does it not matter?
Hi Sharon,
You would need to test this out but I would assume the time zone that your MS Forms is using is based on the time zone setting for your Microsoft 365 Organisation. You may just need to notify students that it is your time zone and not their local.
Thanks, Belinda
I have been entering feedback from a quiz I made for my students however it seems they cannot see it? Is there a way to make this visible to the students? Or have the feedback emailed to them?
Hi,
I am wanting to create a lot of quizzes for my students, but it is so time consuming. Is there a way to create a quiz quickly using a table to input questions and answers? Perhaps the incorrect answers could be randomly chosen from the other answers in the table?
Thanks,
Mandy
Hi Mandy,
At the moment there is no importing options for quizzes. It would be great to see this integrated into the platform but it is not currently available.
Always worthwhile submitting any suggestions through to Microsoft via the Microsoft Forms Feedback Portal.
There has been a suggestion of being able to import from Excel which you could vote for.
https://feedbackportal.microsoft.com/feedback/idea/5a69ec76-d01c-ec11-b6e7-0022481f8945
I created my very first quiz and it keeps coming back with one of the answers needing reviewing even though the students are putting in the correct answer.. I am able to change the score but why is this happening? And, can i go back in to edit an already assigned quiz?
Hi Stacey,
What type of field are you using for this particular question?
Yes you can go back into any quiz and edit it through the https://Forms.Microsoft.com website.
Thanks, Belinda
Is there any way to create a quiz with Mircosoft Forms such that, the form will automatically submit once the set time expires?
Hi Abdussalam,
Not at present there isn’t. It would be a great option so it’s worth voting for this feature to be added via UserVoice.
https://feedbackportal.microsoft.com/feedback/idea/fc11c270-d01c-ec11-b6e7-0022481f8945
Hi the above post was very helpful – thank you. Is there a way to include pictures as the possible answers in a multiple choice quiz?
Hi Clare,
Unfortunately not at the moment, but it would be a great addition. It may be worth while letting Microsoft know that you’d like this feature as it has been suggested via UserVoice. You can upvote for this feature to be added also at https://microsoftforms.uservoice.com/forums/386451-welcome-to-microsoft-forms-suggestion-box/suggestions/34722433-adding-pictures-or-graphics-for-answer-options
Hi Clare,
Unfortuantely there is not yet an option to have pictures as answers. It is worth checking the Microsoft Forms Feedback Portal website to see if anyone has suggested this feature. If they have you can vote for it or add it in as a suggestion of your own. Microsoft Forms Feedback Portal
Thanks, Belinda
Is there a way to create a time limit for how long students can spend on the quiz? I am exploring this option for our school, however I want to minimize how much time students have to answer (to avoid them looking up every answer in the textbook).
Hi Jamie,
At the moment you can only set a start and end date/time on a quiz. I can say the quiz is available from Monday 9am till Wednesday 3pm. There is not currently a timing option to allow access for say, 40 minutes.
Your comment would make an excellent feature and has been suggested via Uservoice. Maybe go and vote for this feature to be added.
https://microsoftforms.uservoice.com/forums/386451-welcome-to-microsoft-forms-suggestion-box/suggestions/33607120-ability-to-make-timed-forms-quizes
Hi, my school is just starting to use Office 365. Do you know if there is a way that students can take a picture of their work and submit it as an answer? I will be teaching Math and Chemistry online now and I am trying to figure out a way to have them submit their work for long answers.
Thanks,
Hi Tanya,
You can use the File Upload question type in the quiz which will allow students to upload a file as their answer.
To add this field type, click the Add New button and then click the ellipsis (…) button to expand the field options and select File Upload from the list. You will be able to select how many files they can upload and also file size. The files will be saved into your OneDrive account.
On another note, you could utilise Microsoft OneNote (using a Class Notebook) or Microsoft Teams with your classes to manage all aspects of learning. Both of these apps work beautifully within the education space. Feel free to send me any further questions.
Regards,
Belinda