The snipping tool in Windows 10 is often one of those unknown apps which can be extremely useful for many users. I spend a lot of time on my computer and I create a lot of content to use in my training courses and my blog posts.
I use screen shots, or images of the actual computer interface in alot of my documentation and I therefore want to make sure that I’m creating these images in the quickest way possible. Let’s identify a few different terms you may have heard of and differentiate the differences between those terms.
What is a screenshot?
A screenshot is the term used to describe our ability to take a picture of our comptuer screen (without using our phone or a camera). This is sometimes also referred to as a “screen grab”. This process creates an image out of the exact things we see on our computer at the time of taking the screenshot. There are actually two ways we can create a screenshot which I will outline below.
Full Screen Shot
A full screenshot is when we take a picture of the entire screen, which will include any open programs or windows, the start button in the bottom left corner and the taskbar along with your system clock.
To create a full screen shot:
- Display the content on the screen which you want to take a full screen shot of
- Press the PrtScn button on your keyboard (on laptops you may need to include the Function, or Fn, button)
- You have now copied the full screen shot to the clipboard of your computer
To use the screen shot in a document, presentation or email:
- Open the document, presentation, or email and place your cursor in the correct spot and press Paste from the ribbon
- The full screen shot will be inserted into your file
If you want to save the screen shot as an image file:
- Open any graphics editing program such as Adobe Photoshop or Microsoft Paint
- Choose Paste from the menu
- The full screen shot will be inserted into the program
- Save the file as a .jpg or suitable file format to your computer for future use
Active window screen shot
Where you want to take a screenshot of a single open window or program, this is where we take a screenshot of only the active window. You will see in the example below that it does not include the start button or taskbar area, only the active Microsoft Word window.
To create a screen shot of just the active window we have displayed:
- Click into the window or program you want to take a screen shot of, it must be the selected or active window on the screen
- Press Alt + PrtScn button on the keyboard
- You have now copied the active window screen shot to the clipboard of your computer
To use the screen shot in a document, presentation or email:
- Open the document, presentation, or email and place your cursor in the correct spot and press Paste from the ribbon
- The full screen shot will be inserted into your file
If you want to save the screen shot as an image file:
- Open any graphics editing program such as Adobe Photoshop or Microsoft Paint
- Choose Paste from the menu
- The full screen shot will be inserted into the program
- Save the file as a .jpg or suitable file format to your computer for future use
Snipping Tool in Windows 10
Now that you know how to create a full screen shot and an active window screen shot, what about when you just need an image of a small section of the screen? This is where the snipping tool steps in. The snipping tool will allow you to “snip” any part of your screen out and use the image however you want.
The snipping tool has actually been around for a long time and Microsoft have now released an all new and improved version called Snip & Sketch. Both programs provide the snipping function though.
- Open up a window or location on your computer where you can see what you want to snip a section from
- Click the Start button in the bottom left corner of the screen
- Type the name of the app, snipping tool
- Your computer will go and find the app. The snipping tool is no longer listed by default in the start menu.

- Click the app to open it
- The Snipping Tool will be displayed
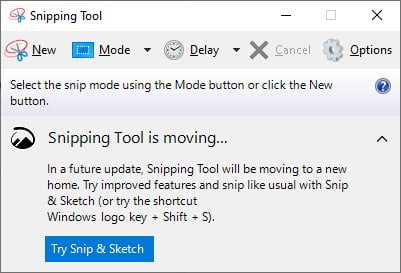
- You can change the snip mode (or shape of the snip) using the Mode drop-down menu.
- I am just going to leave the default Rectangular Snip mode.
- Click the New button
- The majority of your screen will now be greyed out and your cursor will appear as a cross
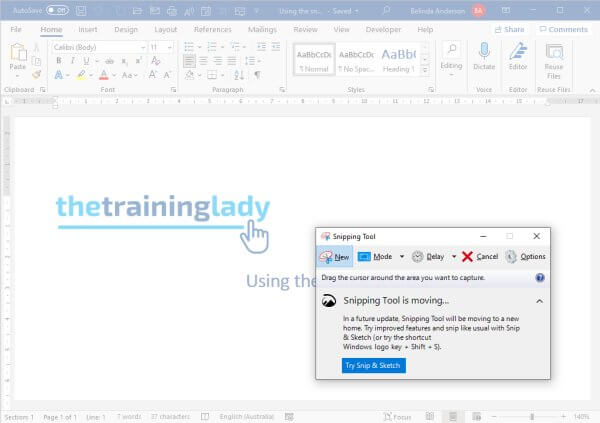
- Use the cursor to draw a rectangle around the area you want to snip out.
- The snipped area will now be displayed in the Snipping Tool window.
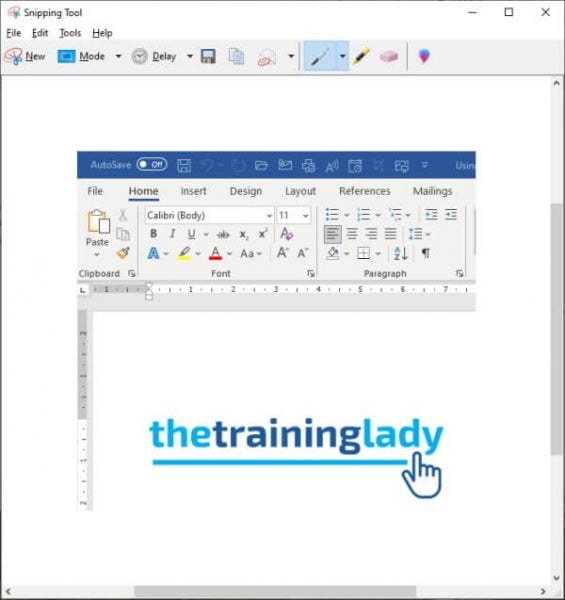
- You can now click the Save icon to save the file as an image or click the Copy button to copy the image and Paste it into any program you choose.
So that shows you the three different ways you can create a screenshot or screen grab and how you can utilise the Snipping Tool included in Windows 10. For some other great tips check out these posts:
- How to use Immersive Reader in Microsoft Edge
- How to create a folder shortcut on the taskbar
- How to crop an image using Microsoft Paint
- Easy ways to move between windows
- Create a custom toolbar menu in Windows 10
Feel free to leave and questions or comments below.