

Flash Fill in Excel is by far one of my favourite Excel features. Learning how to use Flash Fill in Excel should be on everyone’s to do list. It is one of those features which stuns during any of my Excel training courses and it’s the most frequent feature that people come back and say they’ve begun using on a regular basis.
What is Flash Fill?
So what is Flash Fill? Flash Fill provides a way for you to have Excel automatically fill in data patterns. It can be used to extract, or separate data from one column into multiple columns, or even combine data back together when spread across multiple columns. The bonus addition to this is that Excel will fill in any formatting within the pattern and is case sensitive. So if your data is in the wrong case format you can switch it to uppercase or lowercase with ease. It’s essentially a game-changer!
Flash Fill can be described as a static feature, meaning that once the Flash Fill is completed, it won’t update in the future if the original data is changed. But that’s also a benefit of it. Once you have the data in the format you need you can delete the original copy and you are left with the newly formatted version. This is a fantastic feature to use when you need to clean up data which may have been exported from another system and you need to use Excel for data analysis. Don’t like the way a column is formatted? No problems – Flash Fill can fix it.
Flash Fill has actually been around since Excel 2013 however many people still aren’t aware of what it is and what it can do. So get ready to learn a new Excel feature that is up there with some of the best features Excel has to offer.
How is Flash Fill different to Text to Columns?
Many people may be familiar with another feature called Text to Columns. This feature has been around for a very long time and it allows you to separate data from one column into multiple columns, exactly what Flash Fill can do. However Text to Columns involves a 3-step wizard which asks users to specify the type of delimiter used in the data set. This sometimes causes users to cancel out of the wizard as they aren’t familiar with the terminology used and deem it too tricky. Another factor to consider is that Text to Columns will not help if you need to change the format of the data such as case sensitivity.
Lastly and I think importantly, Flash Fill is QUICKER, much QUICKER than the Text to Columns feature.
How is Flash Fill different to AutoFill?
Another comparison feature to Flash Fill is the AutoFill tool. Both features use the phrase “fill” in the name. AutoFill is another tool which can be used to fill in patterns in data however AutoFill works with a blank slate – it doesn’t need to have the data already existing with the worksheet. I can open a completely blank workbook, type in a date and have the AutoFill function fill in the remaining dates for the month or even the entire year or two if i needed it.
Flash Fill however works on the premise that the data already existings and you need to change the way it is formatted or being displayed to be changed. So Flash Fill is not necessarily creating the content from scratch.
Check out the post on how to use AutoFill in Excel.
Tips for using Flash Fill in Excel
- Your starting point will sometimes affect how accurate the flash fill is.
- Flash Fill looks for the data in columns to the left OR right or your cursor. If you use flash fill in column C then Excel will look at column A and B and then column D, E, F etc.
- You do not have to start a Flash Fill at the top of your data set or at the first record in your data – you can use Flash Fill from any position within your data.
- If you make a mistake with the first entry then Excel will replicate the error in the Flash Fill sequence. This means you’ll need to be careful with that first entry – no typos.
- Flash Fill works best when the data format is consistent e.g. Firstname then Surname – not a mixture of different combinations. If the data format is inconsistent then Text to Columns may work better.
- You cannot use Flash Fill in a column where there is existing data. Best option is to insert a new column to then use for Flash Fill.
Download the sample file
Use the button below to download a copy of the sample file so you can follow the steps outlined in this post.
Use Flash Fill with Text
First up let’s look at how we can use Flash Fill in Excel with text based data, for instance, to separate or combine text among different columns.
- Open Microsoft Excel.
- Open a workbook which contains data you wish to use Flash Fill on.
- In my example I have a list of member names all contained within column A.

- To Flash Fill the First Name column of data, place your cursor in ANY cell within column B (it has to be within a row of data, not a blank row).
- Type in the portion of the data you want Excel to Flash Fill, in this case, type the persons first name.
- Press the Enter key, once you have entered the data.

- Select the Data tab and click the Flash Fill button OR press Ctrl + E on the keyboard.
- Excel will fill in the remaining data for all records.

- Repeat the process and click on a row in column C.
- Again type in the data such as the persons surname.
- Remember to press the Enter key when you have finished typing the surname.
- Click the Flash Fill button again OR press Ctrl + E on the keyboard.
- Excel will fill in the surnames.
If you need to change the case sensitivity of your data, you can still use Flash Fill to achieve this, in fact it’s a great part of how Flash Fill works.
- Click on a row in column D.
- Now type in the persons first name, surname or both but this time in all lowercase or UPPERCASE. You can even mix it up and type the persons surname first, followed by a comma and then the first name.
- Remember to press the Enter key when you have finished typing the surname.

- Click the Flash Fill button again OR press Ctrl + E on the keyboard.
- Excel will fill in the names using the same case sensitivity you entered the first example.
What if you want to extract just a section of the data and not the whole set of data? In our example I’d like to extract the initials from each persons name.
- Click on a row in column E.
- Type in the initials for the first record, e.g. BH

- Click the Flash Fill button again OR press Ctrl + E on the keyboard.
- Excel will fill in the initials for each record. However you will notice that is hasn’t quite worked exactly as expected. Flash Fill has actually extracted out all the UPPERCASE letters from each persons names. So for those records where there is an apostrophe or hyphen in the first or surname, Flash Fill has extracted each uppercase letter.
- While the Flash Fill Options button is visible we can edit the Flash Fill results and Excel will automatically update the remaining records.

- Click into the cell for Anthony O’Brien’s initials. Click into the Formula bar and edit the initials to read AB.
- Press Enter and you will see the rest of the list is updated.
- There is however still a record where the first name is hyphenated so again correct the record so that Excel realises it only needs the first letter from both the first and surname.
Use Flash Fill with Numbers
Flash Fill in Excel works really well with text, but it is equally awesome when working with numbers. One example is when working with phone numbers. For us here in Australia, our phone numbers all start with a zero (0). Annoyingly Excel always drops the zero leaving us with phone numbers which are not accurate and missing the first digit. Yes we’ve learn to live with it, some of us know how to work around it, but with Flash Fill we can fix it and have phone numbers displayed in the exact format we need or need.
In the example below I have a column of Australian phone numbers. I want these to be formatted with the area code in brackets ( ) and then spacing between the numbers to make them easier to read.
- Click in the Flash Fill Numbers worksheet.
- Place the cursor in any cell within column B.
- Type in the first example of how you want the phone number to be formatted.

- Press the Enter key to complete entering the phone number.
- Click the Flash Fill button OR press Ctrl + E on the keyboard.
- Excel will fill in the remaining phone numbers using the same format you entered the first example.

Flash Fill Options
Flash Fill in Excel provides you with some additional options whenever you use the feature. The Flash Fill Options button is displayed automatically when you have used Flash Fill and lets you perform aditional things such as Undo the Flash Fill, Accept the suggestions, select the cells which have been changed and select the cells which have not been changed.

Whilst the Flash Fill Options button is displayed, you can correct mistakes you may see in the filled data and then Excel will apply the corrections to other instances of the same mistake. The Flash Fill Options button is like a “one time only offer”, once you move on to the next steps in your worksheet, the button disappears and is no longer available. The only way to get it back is either use the Undo function or create the Flash Fill again for the button to reappear.
Flash Fill Examples
Ok so now that you know that Flash Fill in Excel is pretty awesome, how can you use this in your worksheets? Here is a list of some examples of where/when you can use Flash Fill in Excel:
- Separate text from one cell into multiple cells.
- Combine text from multiple cells into one.

- Extract a portion of data from a single cell.

- Remove unnecessary spaces or characters from existing data.

- Change the case sensitivity of data.
- Change the display of data such as reversing content from “Fname Lname” to “Lname Fname”.

- Edit number formatting such as phone numbers or product codes.
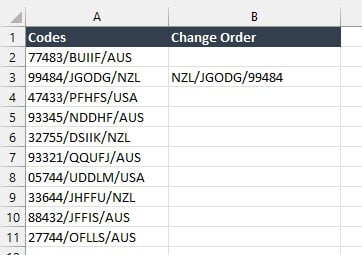
- Change the sequence of a number such as moving numbers from the start to the end.
I hope you have learnt some new skills in using Flash Fill in Excel and some of the useful tricks that go along with it. If you found this post useful then be sure to check out other Excel posts for more handy tips. Feel free to leave comments or questions below.


