

Quite often when working with long documents using Microsoft Word, you need to be mindful of file sizes. If you are utilising multiple graphics or photos within your document then this will have an effect on the end file size of your document.
I work with long documents on a regular basis, both for work and personal purposes and as I’m a visual person, I like to include images and/or photos where appropriate. You can see from my blog posts that I include screenshot images to help people through the steps and to provide an illustration that demonstrates what I’m talking about.
For this reason, you can sometimes find that the end file size of a document or any type of Microsoft Office file can be large, and even too large for the end purpose of the document. A great example is if you need to email the document to a colleague or friend. If the file is too large this will stop you being able to email the file as an attachment. Another great example is if you are trying to be mindful of space you are using on your computer; maybe you are slowly running out of disk space and want to conserve as much as you can.
Microsoft Word, and indeed all of the Microsoft Office products, includes a feature which allows you to automatically compress the file size of individual or all of the graphics/photos included in your document or file.
To compress images, follow these steps:
- Open Microsoft Word
- You should have a new blank document displayed
- Click the Insert tab from the Ribbon and choose Pictures
- You will now see the Insert Picture dialog box which allows you to browse the files on your computers hard drive:
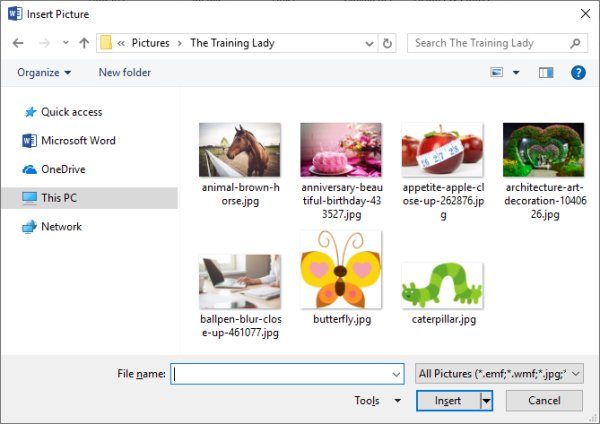
- Locate an image you would like to use
- Select the photo and click Insert
- The photo will now be added to your document
- You will now see a new Tab has appeared on the Ribbon, the Picture Tools > Format tab
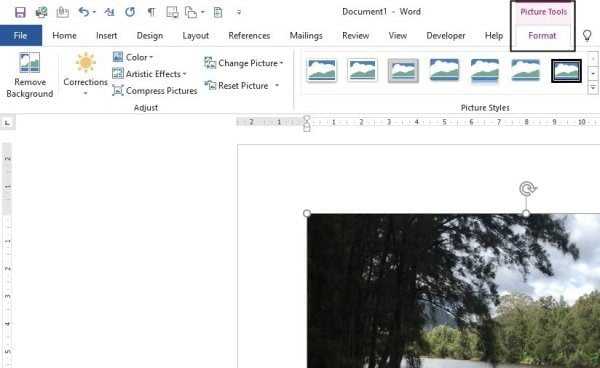
- From the Adjust group, click the Compress Pictures icon

- The Compress Pictures dialog box will appear:

- You must now select which pictures within your document you will compress and your target output, or quality you want the images to maintain. Depending on the resolution of your original image, you will have the options of High Fidelity, HD (330ppi), Print (220ppi), Web (150ppi) or Email (96ppi)
TIP: The term 220ppi refers to “pixels per inch”. Essentially this means that there will be 220 pixels, or dots per inch of the screen giving it a higher quality. The lower the “ppi” the less dots per inch and the lower the quality will be.
- If you only wish to compress the current photograph selected, ensure the Apply only to this picture checkbox is ticked (which is usually is by default)
- To apply compression to ALL pictures within the document untick this box. This will save you A LOT of time if you have many pictures within the one document – there is no need to compress each picture individually
- You will also notice a second checkbox in the Compression options for Delete cropped areas of pictures, if you select this option, which by default is ticked, any images or photos you have cropped using the function within Word will be permanently cropped meaning that you can not go back later and undo the cropping, instead you would need to delete the picture from the document and insert it again
- Now in the Target Output option, select Web (150ppi)
- Click OK
- The pictures will now be compressed. Unfortunately, there is no confirmation on the screen that this has completed so you just have to take my “word” for it – pun intended.. 🙂
If you are working with a long document and need to reduce its file size, make note of the documents file size prior to opening, then go through the above process and apply the compression to ALL pictures within the document. Save and check the file size has reduced.
You may find some of these additional posts interesting which discuss other aspects of using images within your documents.


